> For the complete documentation index, see [llms.txt](https://docs.cherryai.com.cn/llms.txt). Markdown versions of documentation pages are available by appending `.md` to page URLs; this page is available as [Markdown](https://docs.cherryai.com.cn/docs/jp/pre-basic/providers/ppio.md).
# PPIO Paiou Cloud
## Cherry StudioのPPIO LLM API連携
### [](https://ppinfra.com/docs/third-party/cherry-studio-use#%E6%95%99%E7%A8%8B%E6%A6%82%E8%BF%B0) チュートリアル概要
Cherry Studioは、複数モデルに対応したデスクトップクライアントです。現在はWindows、Linux、MacOS対応のインストーラをサポートしています。主要なLLMモデルを集約し、さまざまなシーンでの支援を提供します。ユーザーは、スマート会話管理、オープンソースのカスタマイズ、多テーマのインターフェースを通じて、作業効率を高めることができます。
Cherry Studioは現在 **PPIO高性能APIチャネル** と深く最適化されており、エンタープライズ級の計算リソース保証により、 **DeepSeek-R1/V3の高速応答** と **99.9%のサービス可用性**を実現し、快適でスムーズな体験をお届けします。
以下のチュートリアルには完全な接続手順(キー設定を含む)が含まれており、3分で「Cherry Studioスマートスケジューリング + PPIO高性能API」の上級モードを開始できます。
### [](https://ppinfra.com/docs/third-party/cherry-studio-use#1-%E8%BF%9B%E5%85%A5-cherrystudio%EF%BC%8C%E6%B7%BB%E5%8A%A0-%E2%80%9Cppio%E2%80%9D-%E4%BD%9C%E4%B8%BA%E6%A8%A1%E5%9E%8B%E6%8F%90%E4%BE%9B%E5%95%86) 1. CherryStudioに入り、「PPIO」をモデルプロバイダーとして追加します
まず公式サイトからCherry Studioをダウンロードします:[ ](https://cherryai.com.cn/download) (アクセスできない場合は、下のQuarkクラウドリンクを開いて必要なバージョンをダウンロードしてください:)
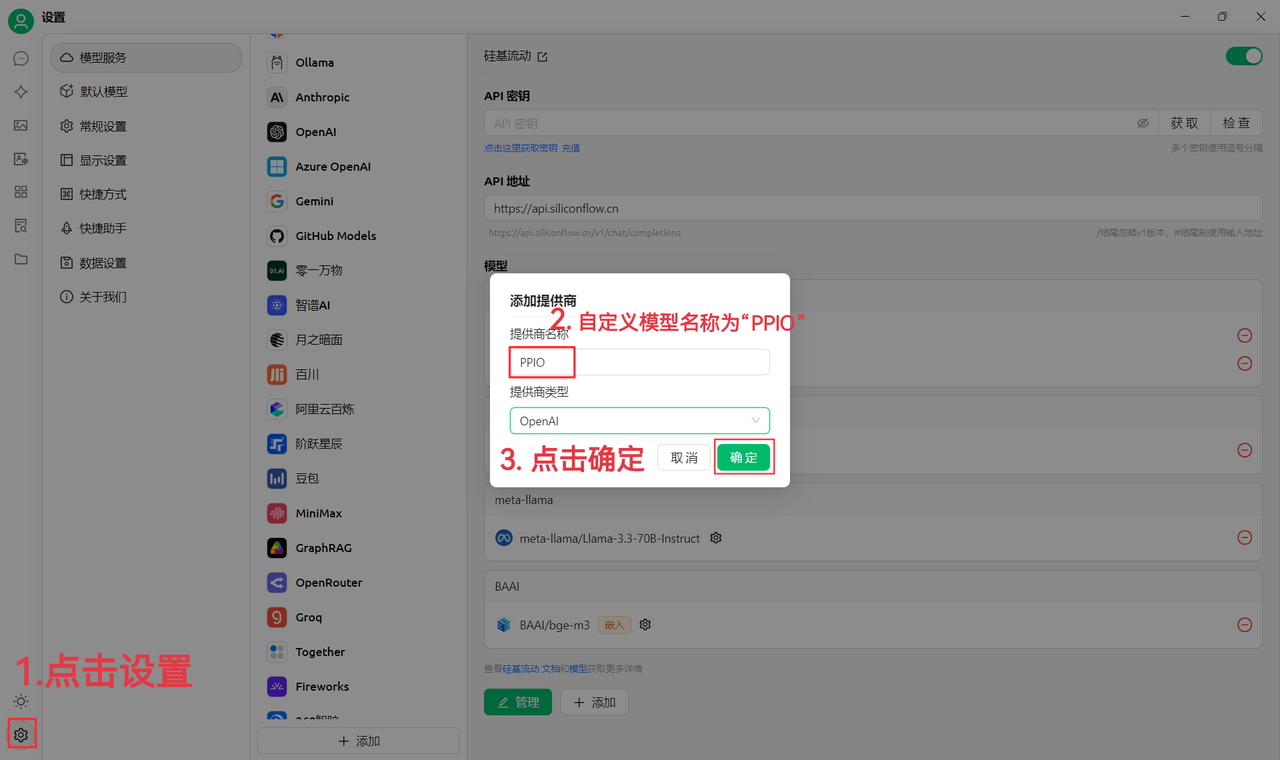
(1)まず左下の設定をクリックし、プロバイダー名を次のようにカスタマイズします:`PPIO`と入力し、「OK」をクリックします
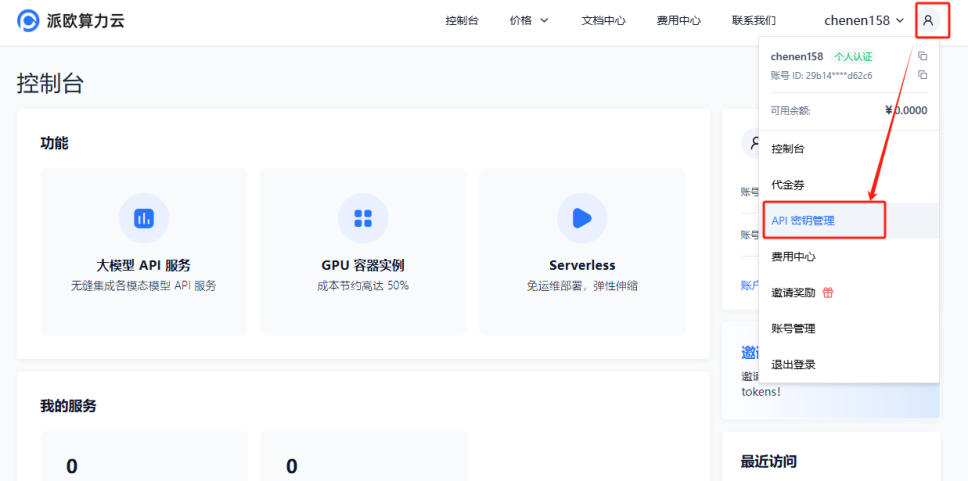
(2)次へ [派欧算力クラウド APIキー管理 ](https://ppinfra.com/user/register?invited_by=JYT9GD\&utm_source=github_cherry-studio)、【ユーザーアイコン】—【APIキー管理】をクリックしてコンソールに入ります
【+ 作成】ボタンをクリックして新しいAPIキーを作成します。キー名は任意で設定し、**生成されたキーは作成時にのみ表示されるため、必ずコピーして文書に保存し、後続の使用に支障が出ないようにしてください**
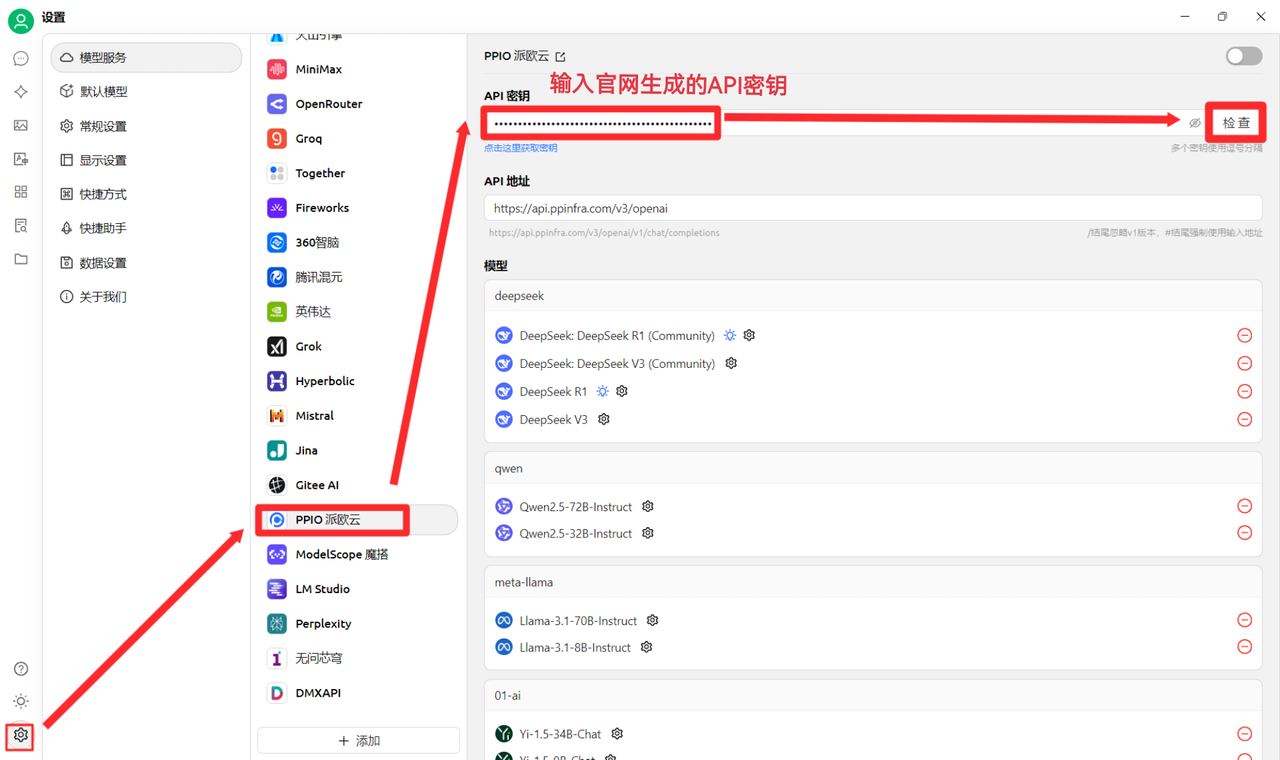
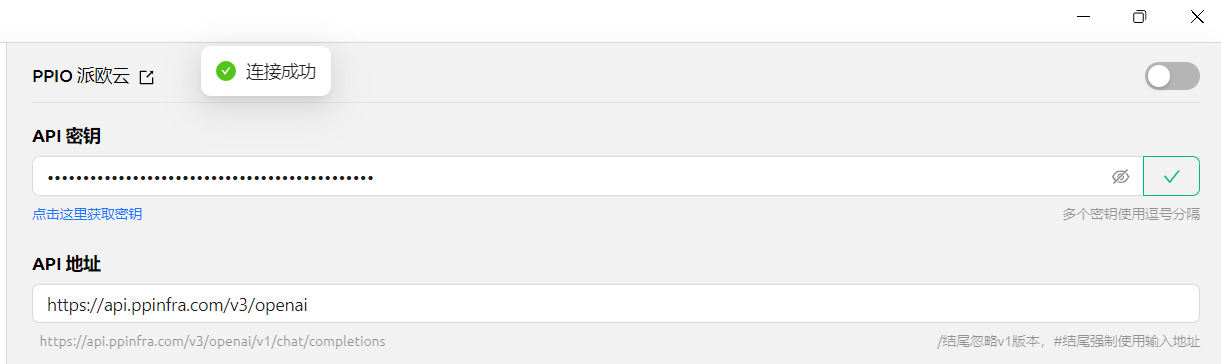
(3)CherryStudioにキーを入力します。設定をクリックし、【PPIO 派欧云】を選択して、公式サイトで生成したAPIキーを入力し、最後に【確認】をクリックします
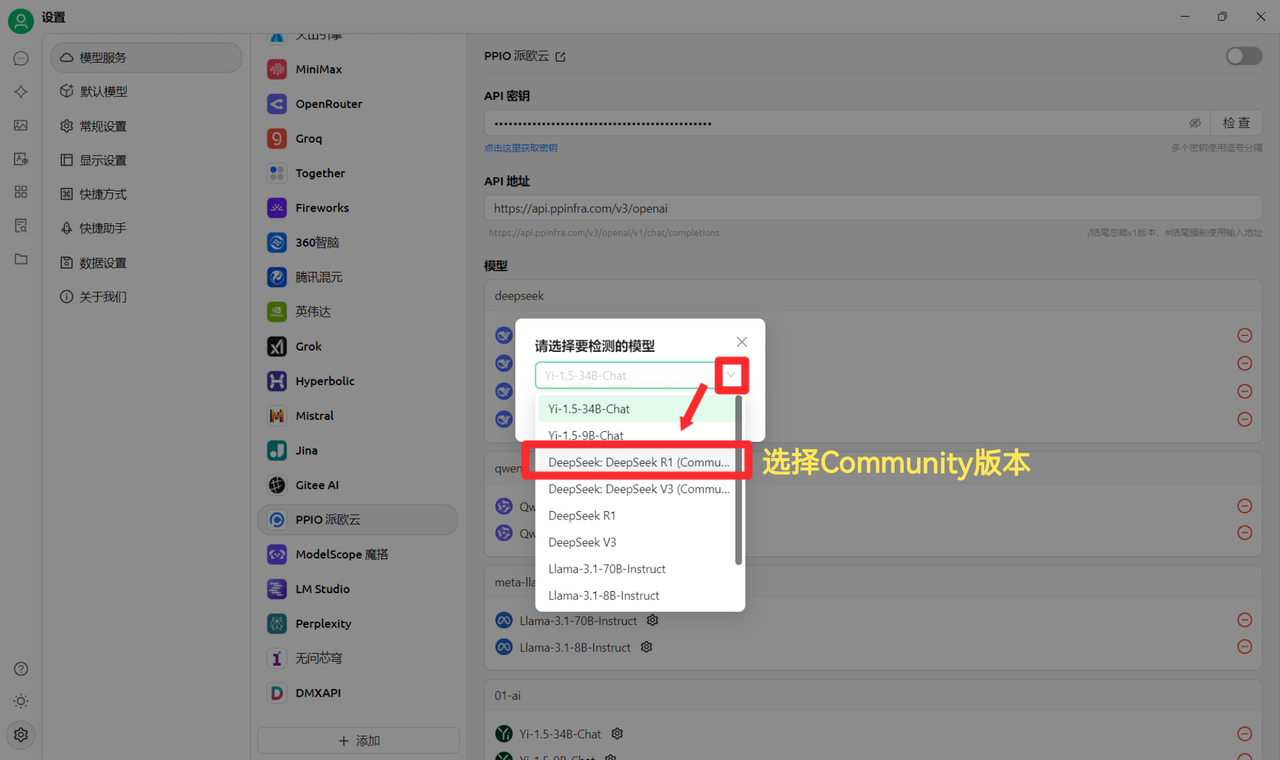
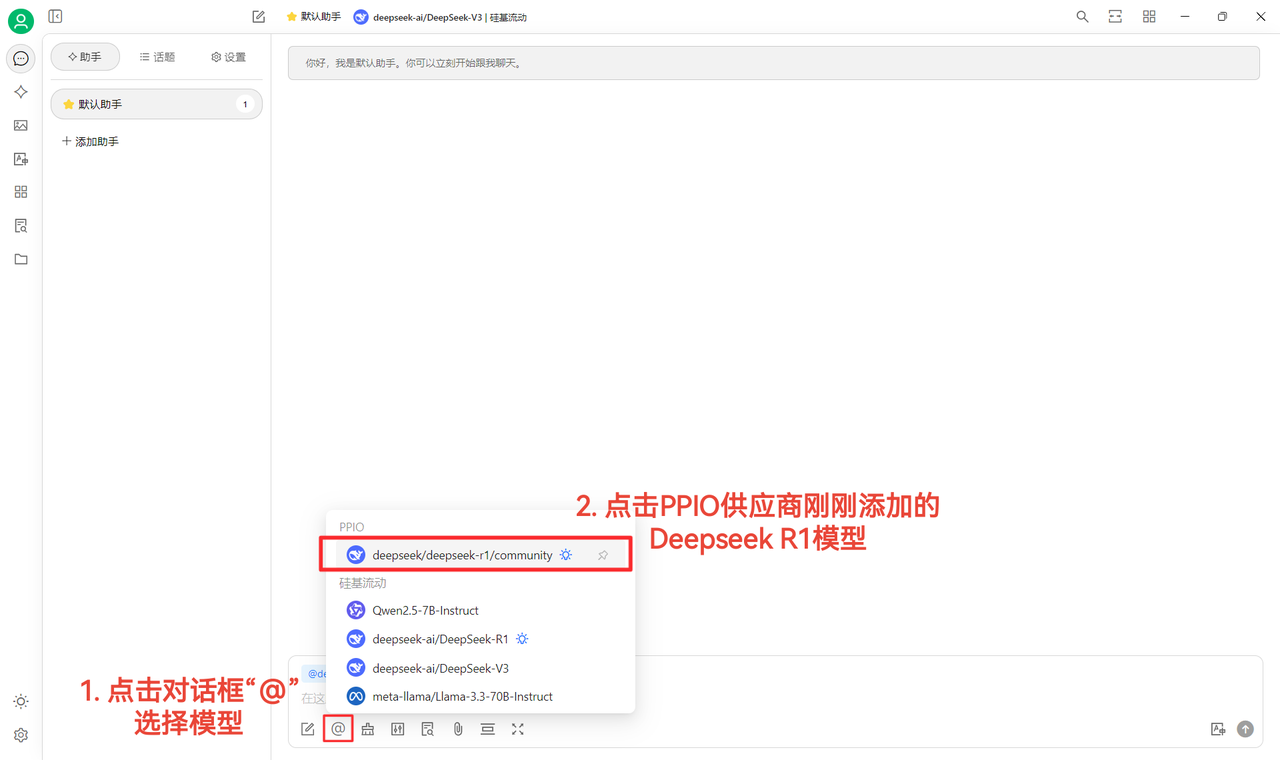
(4)モデルを選択します:例として deepseek/deepseek-r1/community を使用します。別のモデルに切り替える場合は、そのまま変更できます。
DeepSeek R1 と V3 のcommunity版は、まず試してみたい方向けのものであり、フルパラメータの完全版モデルでもあります。安定性や性能に差はありませんが、大量利用する場合は **チャージしてcommunity版以外に切り替える必要があります**。
### [](https://ppinfra.com/docs/third-party/cherry-studio-use#2-%E6%A8%A1%E5%9E%8B%E4%BD%BF%E7%94%A8%E9%85%8D%E7%BD%AE) 2. モデル使用設定
(1)【確認】をクリックし、接続成功と表示されればそのまま使用できます
(2)最後に【@】をクリックし、PPIOプロバイダー下で先ほど追加したDeepSeek R1モデルを選択すると、チャットを開始できます〜
【一部素材の出典:[ 陳恩 ](https://www.kdocs.cn/l/ctGiF5K6PQoO)】
### [](https://ppinfra.com/docs/third-party/cherry-studio-use#3-ppio%C3%97cherry-studio-%E8%A7%86%E9%A2%91%E4%BD%BF%E7%94%A8%E6%95%99%E7%A8%8B) 3. PPIO×Cherry Studio 動画チュートリアル
視覚的に学ぶのがお好みなら、Bilibiliに動画チュートリアルをご用意しています。手取り足取りの解説で、「PPIO API+Cherry Studio」の設定方法をすばやく習得できます。下のリンクをクリックして動画へ直接アクセスし、快適な開発体験を始めましょう → [《【DeepSeekのぐるぐるロードにまだイライラしてますか?】派欧云+DeepSeek 完全版 =?もう渋滞なし、今すぐ飛び立とう》](https://www.bilibili.com/video/BV1BZNmeTEwg/?buvid=XX82F37818653072D274A6BB8A4FE7938A30C\&from_spmid=search.search-result.0.0\&is_story_h5=false\&mid=3CpKQv%2Bjnb8k6iTGlUl1eH8FTQ%2FSZMtL1rElX6M3iMo%3D\&plat_id=116\&share_from=ugc\&share_medium=android\&share_plat=android\&share_session_id=b892268f-5751-4f6e-9690-50b37855d346\&share_source=WEIXIN\&share_source=weixin\&share_tag=s_i\&spmid=united.player-video-detail.0.0\×tamp=1739160448\&unique_k=eKDZuRP\&up_id=3546757841554023\&vd_source=50fea165795ccc47455a165f5bcaeed2)
【動画素材の出典:sola】
***
### ヘルプの取得とフィードバックの送信
設定または使用中に不明点、バグ、機能改善の提案がある場合は、 [フィードバックと提案](/docs/jp/question-contact/suggestions.md) に記載の公式チャネルをご参照ください。
---
# Agent Instructions
This documentation is published with GitBook. GitBook is the documentation platform designed so that both humans and AI agents can read, navigate, and reason over technical content effectively. Learn more at gitbook.com.
## Querying This Documentation
If you need additional information that is not directly available in this page, you can query the documentation dynamically by asking a question.
Perform an HTTP GET request on the current page URL with the `ask` query parameter, and the optional `goal` query parameter:
```
GET https://docs.cherryai.com.cn/docs/jp/pre-basic/providers/ppio.md?ask=&goal=
```
`ask` is the immediate question: it should be specific, self-contained, and written in natural language.
`goal` is optional and describes the broader end goal you are ultimately trying to accomplish on behalf of the user. GitBook uses it to tailor the answer towards what is most useful for that goal.
The response will contain a direct answer to the question and relevant excerpts and sources from the documentation.
Use this mechanism when the answer is not explicitly present in the current page, you need clarification or additional context, or you want to retrieve related documentation sections.