> For the complete documentation index, see [llms.txt](https://docs.cherryai.com.cn/llms.txt). Markdown versions of documentation pages are available by appending `.md` to page URLs; this page is available as [Markdown](https://docs.cherryai.com.cn/docs/zhong-wen-fan-ti/pre-basic/settings/websearch/searxng.md).
# SearXNG 本地部署同配置
CherryStudio 支持透過 SearXNG 做網絡搜尋,SearXNG 係一個可以喺本地部署亦可以喺伺服器部署嘅開源項目,所以同其他需要 API 提供商嘅配置方式會有少少唔同。
**SearXNG 項目連結**:[SearXNG](https://github.com/searxng/searxng)
## SearXNG 嘅優勢
* 開源免費,唔使 API
* 私隱性相對較高
* 可以高度自訂
## 本地部署
### 一、Docker 直接部署
由於 SearXNG 唔需要複雜嘅環境配置,可以唔使 docker compose,只要簡單提供一個閒置端口就可以部署,所以最快捷嘅方法可以直接用 Docker 拉取映像嚟部署。
#### 1. 下載安裝同配置 [docker](https://www.docker.com/)
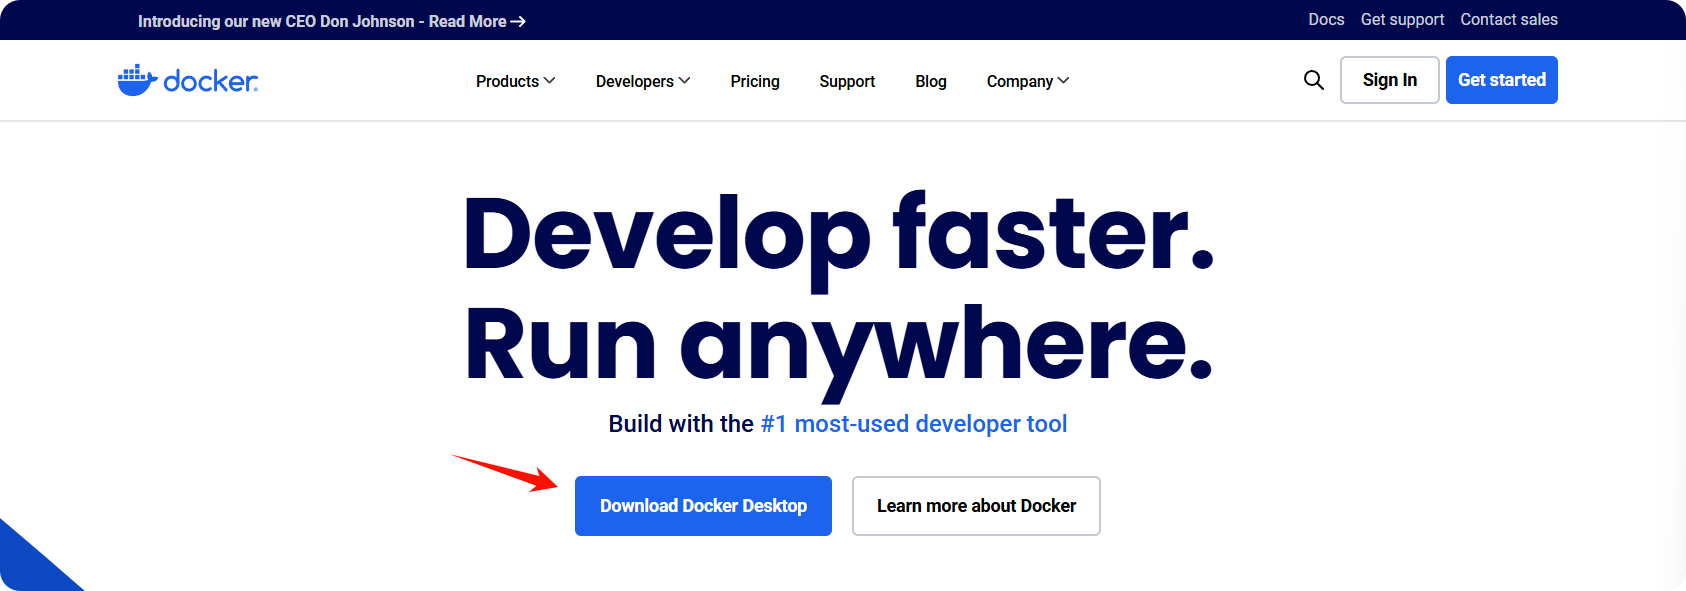 安裝後揀一個映像儲存路徑:
 #### 2. 搜尋並拉取 SearXNG 映像
搜尋欄輸入 **searxng** :
#### 2. 搜尋並拉取 SearXNG 映像
搜尋欄輸入 **searxng** :
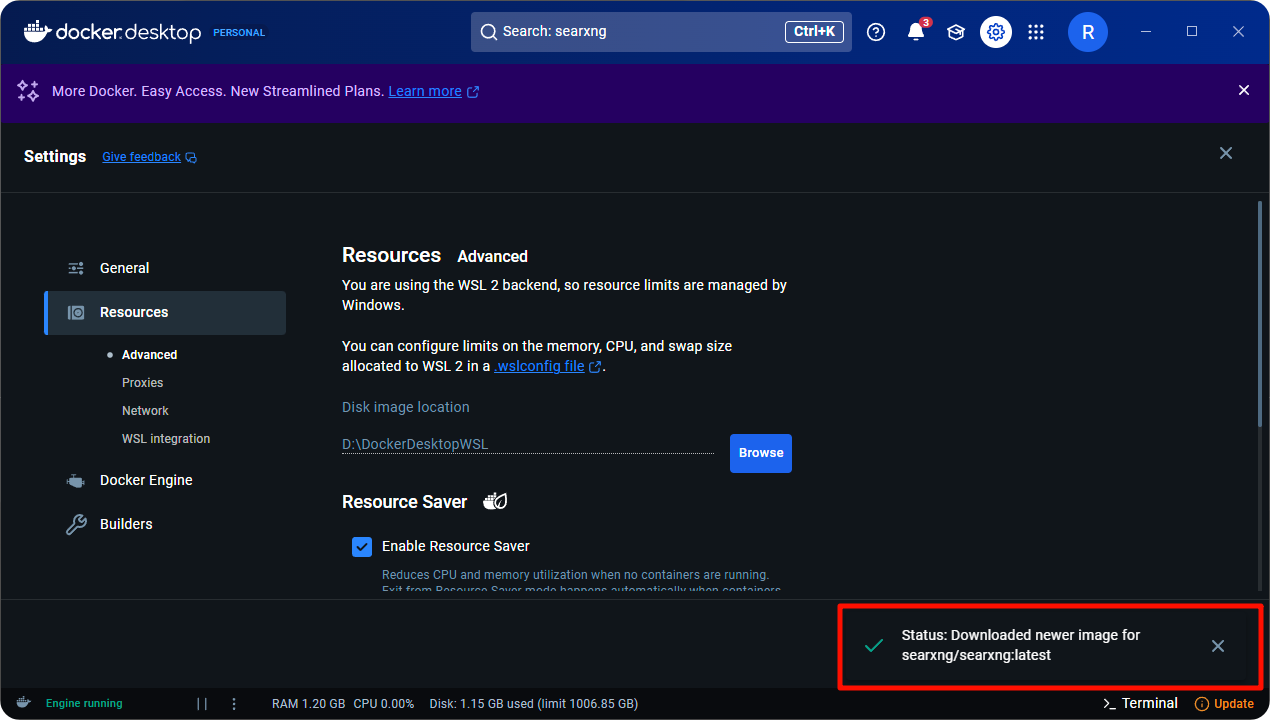
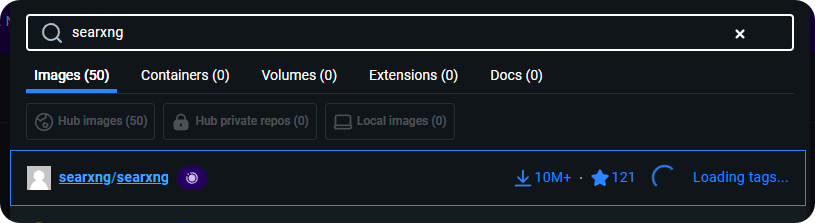 拉取映像:
拉取映像:

 #### 3. 運行映像
拉取成功之後去到 **images** 頁面:
#### 3. 運行映像
拉取成功之後去到 **images** 頁面:
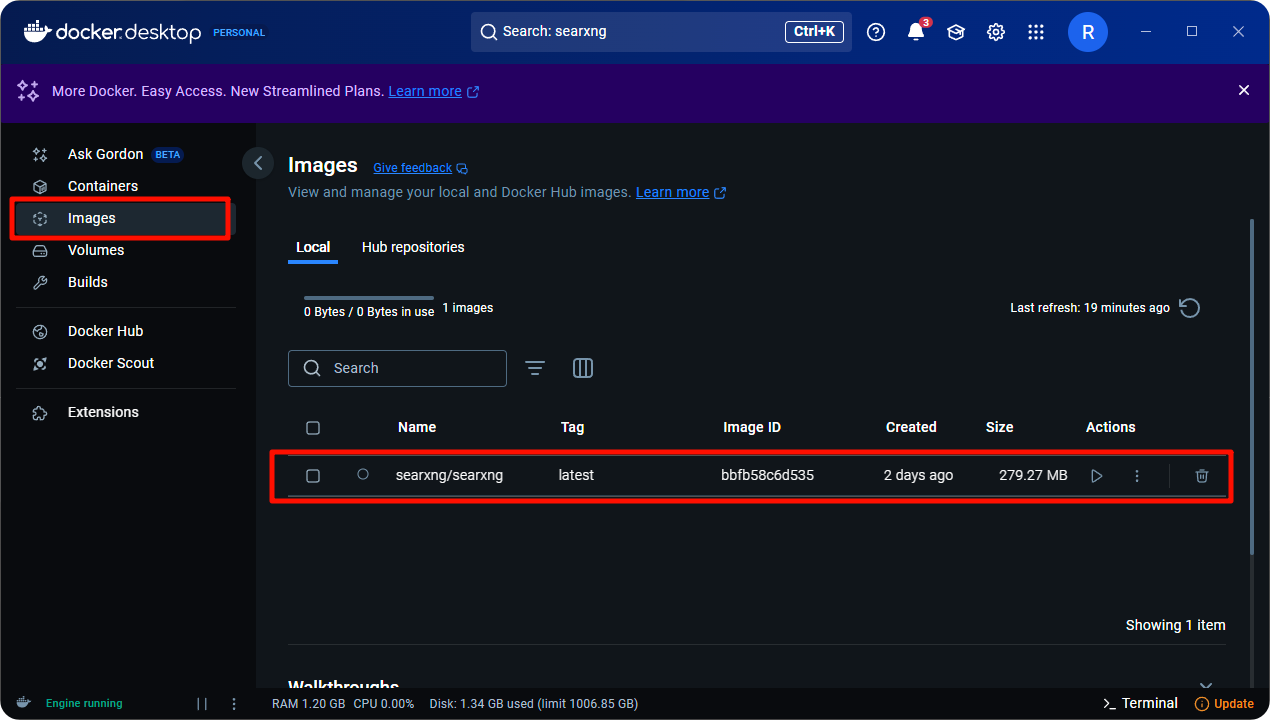 揀返拉取嘅映像再撳運行:
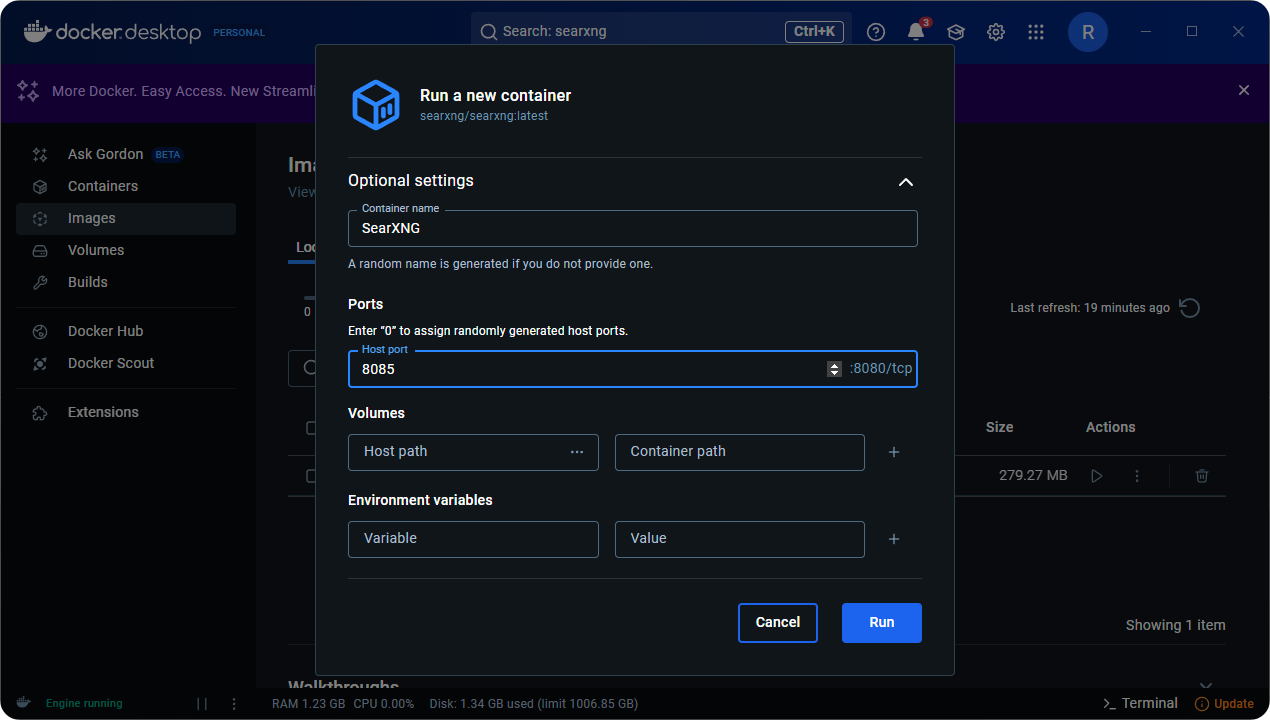
 打開設定項進行配置:
 以 `8085` 端口為例:
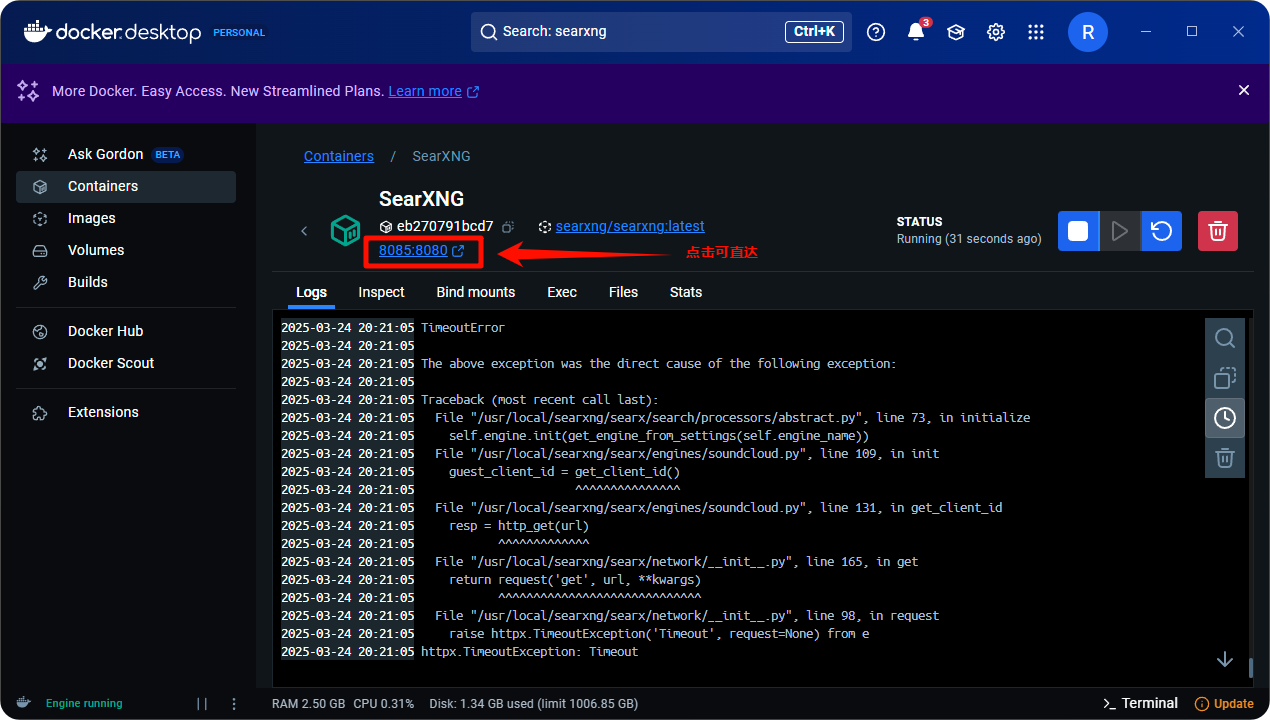
 運行成功後撳連結就可以打開 SearXNG 嘅前端介面:
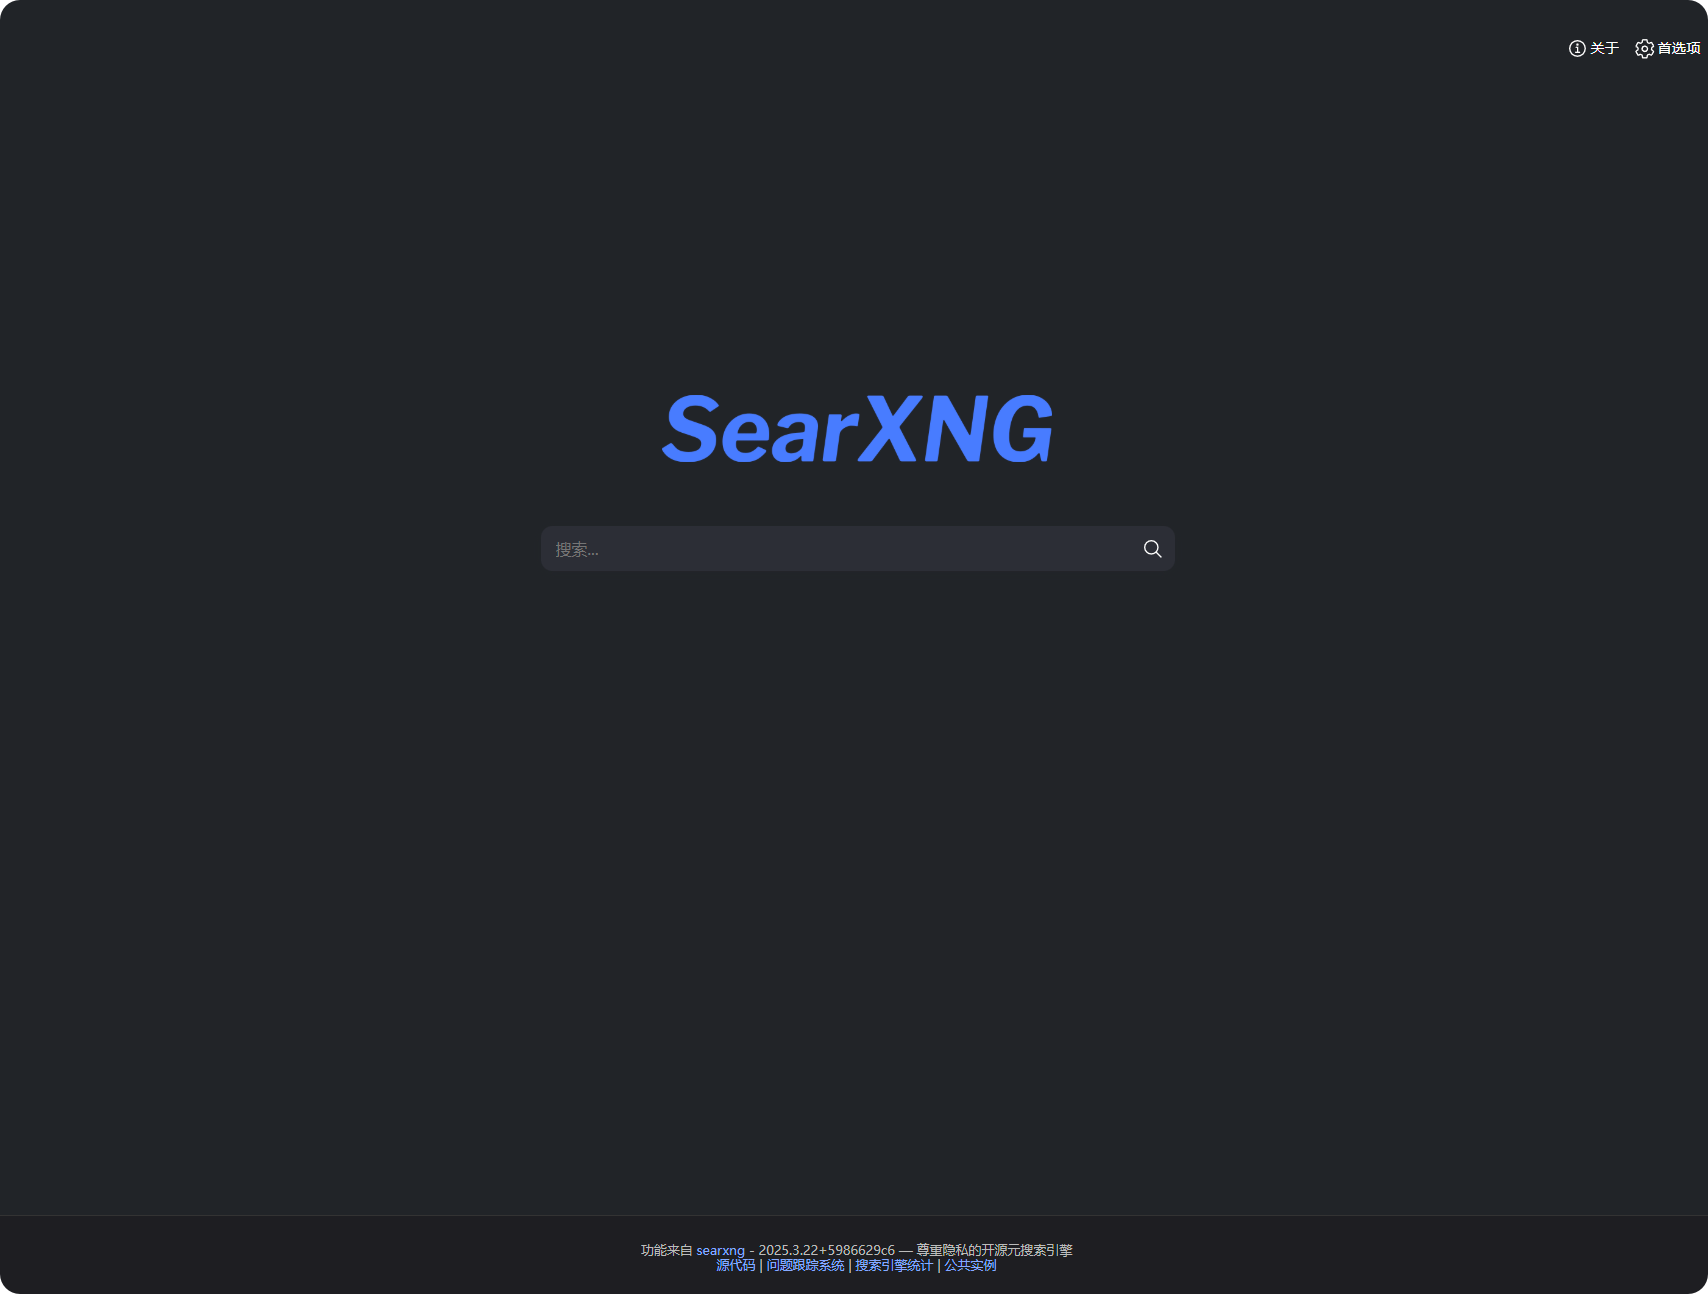
 見到呢個頁面就代表部署成功:
 ## 伺服器部署
考慮到喺 Windows 底下安裝 Docker 係幾麻煩嘅事,使用者可以將 SearXNG 部署喺伺服器上,亦可以順便分享畀其他人用。不過可惜嘅係,SearXNG 本身暫時唔支援驗證,令其他人可以透過技術手段掃到同濫用你部署嘅實例。
為咗呢個原因,Cherry Studio 目前已支援設定 [HTTP 基本認證(RFC7617)](https://developer.mozilla.org/zh-CN/docs/Web/HTTP/Guides/Authentication),如果使用者想將自己部署嘅 SearXNG 露出喺公網環境下,請 **務必** 透過 Nginx 等反向代理軟件配置 HTTP 基本認證。下面提供簡要教學,需要你有基本嘅 Linux 維運知識。
### 部署 SearXNG
類似咁,仍然係用 Docker 部署。假設你已經按照 [官方教學](https://docs.docker.com/engine/install) 喺伺服器上安裝好最新版 Docker CE,以下提供一條龍命令,適用於 Debian 系統下全新安裝:
```bash
sudo apt update
sudo apt install git -y
# 拉取官方倉庫
cd /opt
git clone https://github.com/searxng/searxng-docker.git
cd /opt/searxng-docker
# 如果你嘅伺服器帶寬好細,可以設為 false
export IMAGE_PROXY=true
# 修改設定檔
cat < /opt/searxng-docker/searxng/settings.yml
# 睇 https://docs.searxng.org/admin/settings/settings.html#settings-use-default-settings
use_default_settings: true
server:
# base_url 係喺 SEARXNG_BASE_URL 環境變數入面定義,睇 .env 同 docker-compose.yml
secret_key: $(openssl rand -hex 32)
limiter: false # private instance 可以關閉
image_proxy: $IMAGE_PROXY
ui:
static_use_hash: true
redis:
url: redis://redis:6379/0
search:
formats:
- html
- json
EOF
```
如果你需要改本地監聽端口、重用本地已有嘅 nginx,可以編輯 `docker-compose.yaml` 文件,參考如下:
```yaml
version: "3.7"
services:
# 如果唔需要 Caddy,而係重用本地已經有嘅 Nginx,就刪走下面呢段。我哋預設唔需要 Caddy.
caddy:
container_name: caddy
image: docker.io/library/caddy:2-alpine
network_mode: host
restart: unless-stopped
volumes:
- ./Caddyfile:/etc/caddy/Caddyfile:ro
- caddy-data:/data:rw
- caddy-config:/config:rw
environment:
- SEARXNG_HOSTNAME=${SEARXNG_HOSTNAME:-http://localhost}
- SEARXNG_TLS=${LETSENCRYPT_EMAIL:-internal}
cap_drop:
- ALL
cap_add:
- NET_BIND_SERVICE
logging:
driver: "json-file"
options:
max-size: "1m"
max-file: "1"
# 如果唔需要 Caddy,而係重用本地已經有嘅 Nginx,就刪走上面嗰段。我哋預設唔需要 Caddy.
redis:
container_name: redis
image: docker.io/valkey/valkey:8-alpine
command: valkey-server --save 30 1 --loglevel warning
restart: unless-stopped
networks:
- searxng
volumes:
- valkey-data2:/data
cap_drop:
- ALL
cap_add:
- SETGID
- SETUID
- DAC_OVERRIDE
logging:
driver: "json-file"
options:
max-size: "1m"
max-file: "1"
searxng:
container_name: searxng
image: docker.io/searxng/searxng:latest
restart: unless-stopped
networks:
- searxng
# 預設映射到宿主機 8080 端口,如果你想監聽 8000,就改做 "127.0.0.1:8000:8080"
ports:
- "127.0.0.1:8080:8080"
volumes:
- ./searxng:/etc/searxng:rw
environment:
- SEARXNG_BASE_URL=https://${SEARXNG_HOSTNAME:-localhost}/
- UWSGI_WORKERS=${SEARXNG_UWSGI_WORKERS:-4}
- UWSGI_THREADS=${SEARXNG_UWSGI_THREADS:-4}
cap_drop:
- ALL
cap_add:
- CHOWN
- SETGID
- SETUID
logging:
driver: "json-file"
options:
max-size: "1m"
max-file: "1"
networks:
searxng:
volumes:
# 如果唔需要 Caddy,而係重用本地已經有嘅 Nginx,就刪走下面嗰段
caddy-data:
caddy-config:
# 如果唔需要 Caddy,而係重用本地已經有嘅 Nginx,就刪走上面嗰段
valkey-data2:
```
執行 `docker compose up -d` 啟動。執行 `docker compose logs -f searxng` 可以睇到日誌。
### 部署 Nginx 反向代理同 HTTP 基本認證
如果你用咗啲伺服器面板程式,例如寶塔面板或者 1Panel,請參考佢哋嘅文件加網站同配置 nginx 反向代理,之後搵到修改 nginx 設定檔嘅地方,\n參考下面嘅示例嚟修改:
```conf
server
{
listen 443 ssl;
# 呢行係你嘅主機名
server_name search.example.com;
# index index.html;
# root /data/www/default;
# 如果配咗 SSL 應該有呢兩行
ssl_certificate /path/to/your/cert/fullchain.pem;
ssl_certificate_key /path/to/your/cert/privkey.pem;
# HSTS
# add_header Strict-Transport-Security "max-age=31536000; includeSubDomains; preload";
# 一般嚟講經面板配置反向代理,預設嘅 location 區塊就係咁
location / {
# 只需要喺 location 區塊加下面兩行,其他保留原樣就得。
# 呢度示例假設你嘅設定檔擺喺 /etc/nginx/conf.d/ 目錄下面。
# 如果係寶塔,應該係擺喺 /www 呢類目錄下面,要留意。
auth_basic "請輸入你嘅用戶名同密碼";
auth_basic_user_file /etc/nginx/conf.d/search.htpasswd;
proxy_http_version 1.1;
proxy_set_header Connection "";
proxy_redirect off;
proxy_set_header Host $host;
proxy_set_header X-Forwarded-For $proxy_protocol_addr;
proxy_pass http://127.0.0.1:8000;
client_max_body_size 0;
}
# access_log ...;
# error_log ...;
}
```
假設 Nginx 設定檔保存喺 `/etc/nginx/conf.d` 下面,我哋會將密碼檔案保存在同一目錄。
執行命令(自行將 `example_name`、`example_password` 替換做你要設定嘅用戶名同密碼):
```bash
echo "example_name:$(openssl passwd -5 'example_password')" > /etc/nginx/conf.d/search.htpasswd
```
重啟 Nginx(重載設定都得)。
呢個時候可以打開下網頁,已經會提示你輸入用戶名同密碼,請輸入前面設定嘅用戶名同密碼睇下能唔能夠成功入到 SearXNG 搜尋頁面,藉此檢查配置係咪正確。
## 伺服器部署
考慮到喺 Windows 底下安裝 Docker 係幾麻煩嘅事,使用者可以將 SearXNG 部署喺伺服器上,亦可以順便分享畀其他人用。不過可惜嘅係,SearXNG 本身暫時唔支援驗證,令其他人可以透過技術手段掃到同濫用你部署嘅實例。
為咗呢個原因,Cherry Studio 目前已支援設定 [HTTP 基本認證(RFC7617)](https://developer.mozilla.org/zh-CN/docs/Web/HTTP/Guides/Authentication),如果使用者想將自己部署嘅 SearXNG 露出喺公網環境下,請 **務必** 透過 Nginx 等反向代理軟件配置 HTTP 基本認證。下面提供簡要教學,需要你有基本嘅 Linux 維運知識。
### 部署 SearXNG
類似咁,仍然係用 Docker 部署。假設你已經按照 [官方教學](https://docs.docker.com/engine/install) 喺伺服器上安裝好最新版 Docker CE,以下提供一條龍命令,適用於 Debian 系統下全新安裝:
```bash
sudo apt update
sudo apt install git -y
# 拉取官方倉庫
cd /opt
git clone https://github.com/searxng/searxng-docker.git
cd /opt/searxng-docker
# 如果你嘅伺服器帶寬好細,可以設為 false
export IMAGE_PROXY=true
# 修改設定檔
cat < /opt/searxng-docker/searxng/settings.yml
# 睇 https://docs.searxng.org/admin/settings/settings.html#settings-use-default-settings
use_default_settings: true
server:
# base_url 係喺 SEARXNG_BASE_URL 環境變數入面定義,睇 .env 同 docker-compose.yml
secret_key: $(openssl rand -hex 32)
limiter: false # private instance 可以關閉
image_proxy: $IMAGE_PROXY
ui:
static_use_hash: true
redis:
url: redis://redis:6379/0
search:
formats:
- html
- json
EOF
```
如果你需要改本地監聽端口、重用本地已有嘅 nginx,可以編輯 `docker-compose.yaml` 文件,參考如下:
```yaml
version: "3.7"
services:
# 如果唔需要 Caddy,而係重用本地已經有嘅 Nginx,就刪走下面呢段。我哋預設唔需要 Caddy.
caddy:
container_name: caddy
image: docker.io/library/caddy:2-alpine
network_mode: host
restart: unless-stopped
volumes:
- ./Caddyfile:/etc/caddy/Caddyfile:ro
- caddy-data:/data:rw
- caddy-config:/config:rw
environment:
- SEARXNG_HOSTNAME=${SEARXNG_HOSTNAME:-http://localhost}
- SEARXNG_TLS=${LETSENCRYPT_EMAIL:-internal}
cap_drop:
- ALL
cap_add:
- NET_BIND_SERVICE
logging:
driver: "json-file"
options:
max-size: "1m"
max-file: "1"
# 如果唔需要 Caddy,而係重用本地已經有嘅 Nginx,就刪走上面嗰段。我哋預設唔需要 Caddy.
redis:
container_name: redis
image: docker.io/valkey/valkey:8-alpine
command: valkey-server --save 30 1 --loglevel warning
restart: unless-stopped
networks:
- searxng
volumes:
- valkey-data2:/data
cap_drop:
- ALL
cap_add:
- SETGID
- SETUID
- DAC_OVERRIDE
logging:
driver: "json-file"
options:
max-size: "1m"
max-file: "1"
searxng:
container_name: searxng
image: docker.io/searxng/searxng:latest
restart: unless-stopped
networks:
- searxng
# 預設映射到宿主機 8080 端口,如果你想監聽 8000,就改做 "127.0.0.1:8000:8080"
ports:
- "127.0.0.1:8080:8080"
volumes:
- ./searxng:/etc/searxng:rw
environment:
- SEARXNG_BASE_URL=https://${SEARXNG_HOSTNAME:-localhost}/
- UWSGI_WORKERS=${SEARXNG_UWSGI_WORKERS:-4}
- UWSGI_THREADS=${SEARXNG_UWSGI_THREADS:-4}
cap_drop:
- ALL
cap_add:
- CHOWN
- SETGID
- SETUID
logging:
driver: "json-file"
options:
max-size: "1m"
max-file: "1"
networks:
searxng:
volumes:
# 如果唔需要 Caddy,而係重用本地已經有嘅 Nginx,就刪走下面嗰段
caddy-data:
caddy-config:
# 如果唔需要 Caddy,而係重用本地已經有嘅 Nginx,就刪走上面嗰段
valkey-data2:
```
執行 `docker compose up -d` 啟動。執行 `docker compose logs -f searxng` 可以睇到日誌。
### 部署 Nginx 反向代理同 HTTP 基本認證
如果你用咗啲伺服器面板程式,例如寶塔面板或者 1Panel,請參考佢哋嘅文件加網站同配置 nginx 反向代理,之後搵到修改 nginx 設定檔嘅地方,\n參考下面嘅示例嚟修改:
```conf
server
{
listen 443 ssl;
# 呢行係你嘅主機名
server_name search.example.com;
# index index.html;
# root /data/www/default;
# 如果配咗 SSL 應該有呢兩行
ssl_certificate /path/to/your/cert/fullchain.pem;
ssl_certificate_key /path/to/your/cert/privkey.pem;
# HSTS
# add_header Strict-Transport-Security "max-age=31536000; includeSubDomains; preload";
# 一般嚟講經面板配置反向代理,預設嘅 location 區塊就係咁
location / {
# 只需要喺 location 區塊加下面兩行,其他保留原樣就得。
# 呢度示例假設你嘅設定檔擺喺 /etc/nginx/conf.d/ 目錄下面。
# 如果係寶塔,應該係擺喺 /www 呢類目錄下面,要留意。
auth_basic "請輸入你嘅用戶名同密碼";
auth_basic_user_file /etc/nginx/conf.d/search.htpasswd;
proxy_http_version 1.1;
proxy_set_header Connection "";
proxy_redirect off;
proxy_set_header Host $host;
proxy_set_header X-Forwarded-For $proxy_protocol_addr;
proxy_pass http://127.0.0.1:8000;
client_max_body_size 0;
}
# access_log ...;
# error_log ...;
}
```
假設 Nginx 設定檔保存喺 `/etc/nginx/conf.d` 下面,我哋會將密碼檔案保存在同一目錄。
執行命令(自行將 `example_name`、`example_password` 替換做你要設定嘅用戶名同密碼):
```bash
echo "example_name:$(openssl passwd -5 'example_password')" > /etc/nginx/conf.d/search.htpasswd
```
重啟 Nginx(重載設定都得)。
呢個時候可以打開下網頁,已經會提示你輸入用戶名同密碼,請輸入前面設定嘅用戶名同密碼睇下能唔能夠成功入到 SearXNG 搜尋頁面,藉此檢查配置係咪正確。
 ## Cherry Studio 相關配置
SearXNG 本地或者喺伺服器部署成功之後,跟住就係 CherryStudio 嘅相關配置。
去到網絡搜尋設定頁面,揀 Searxng :
## Cherry Studio 相關配置
SearXNG 本地或者喺伺服器部署成功之後,跟住就係 CherryStudio 嘅相關配置。
去到網絡搜尋設定頁面,揀 Searxng :
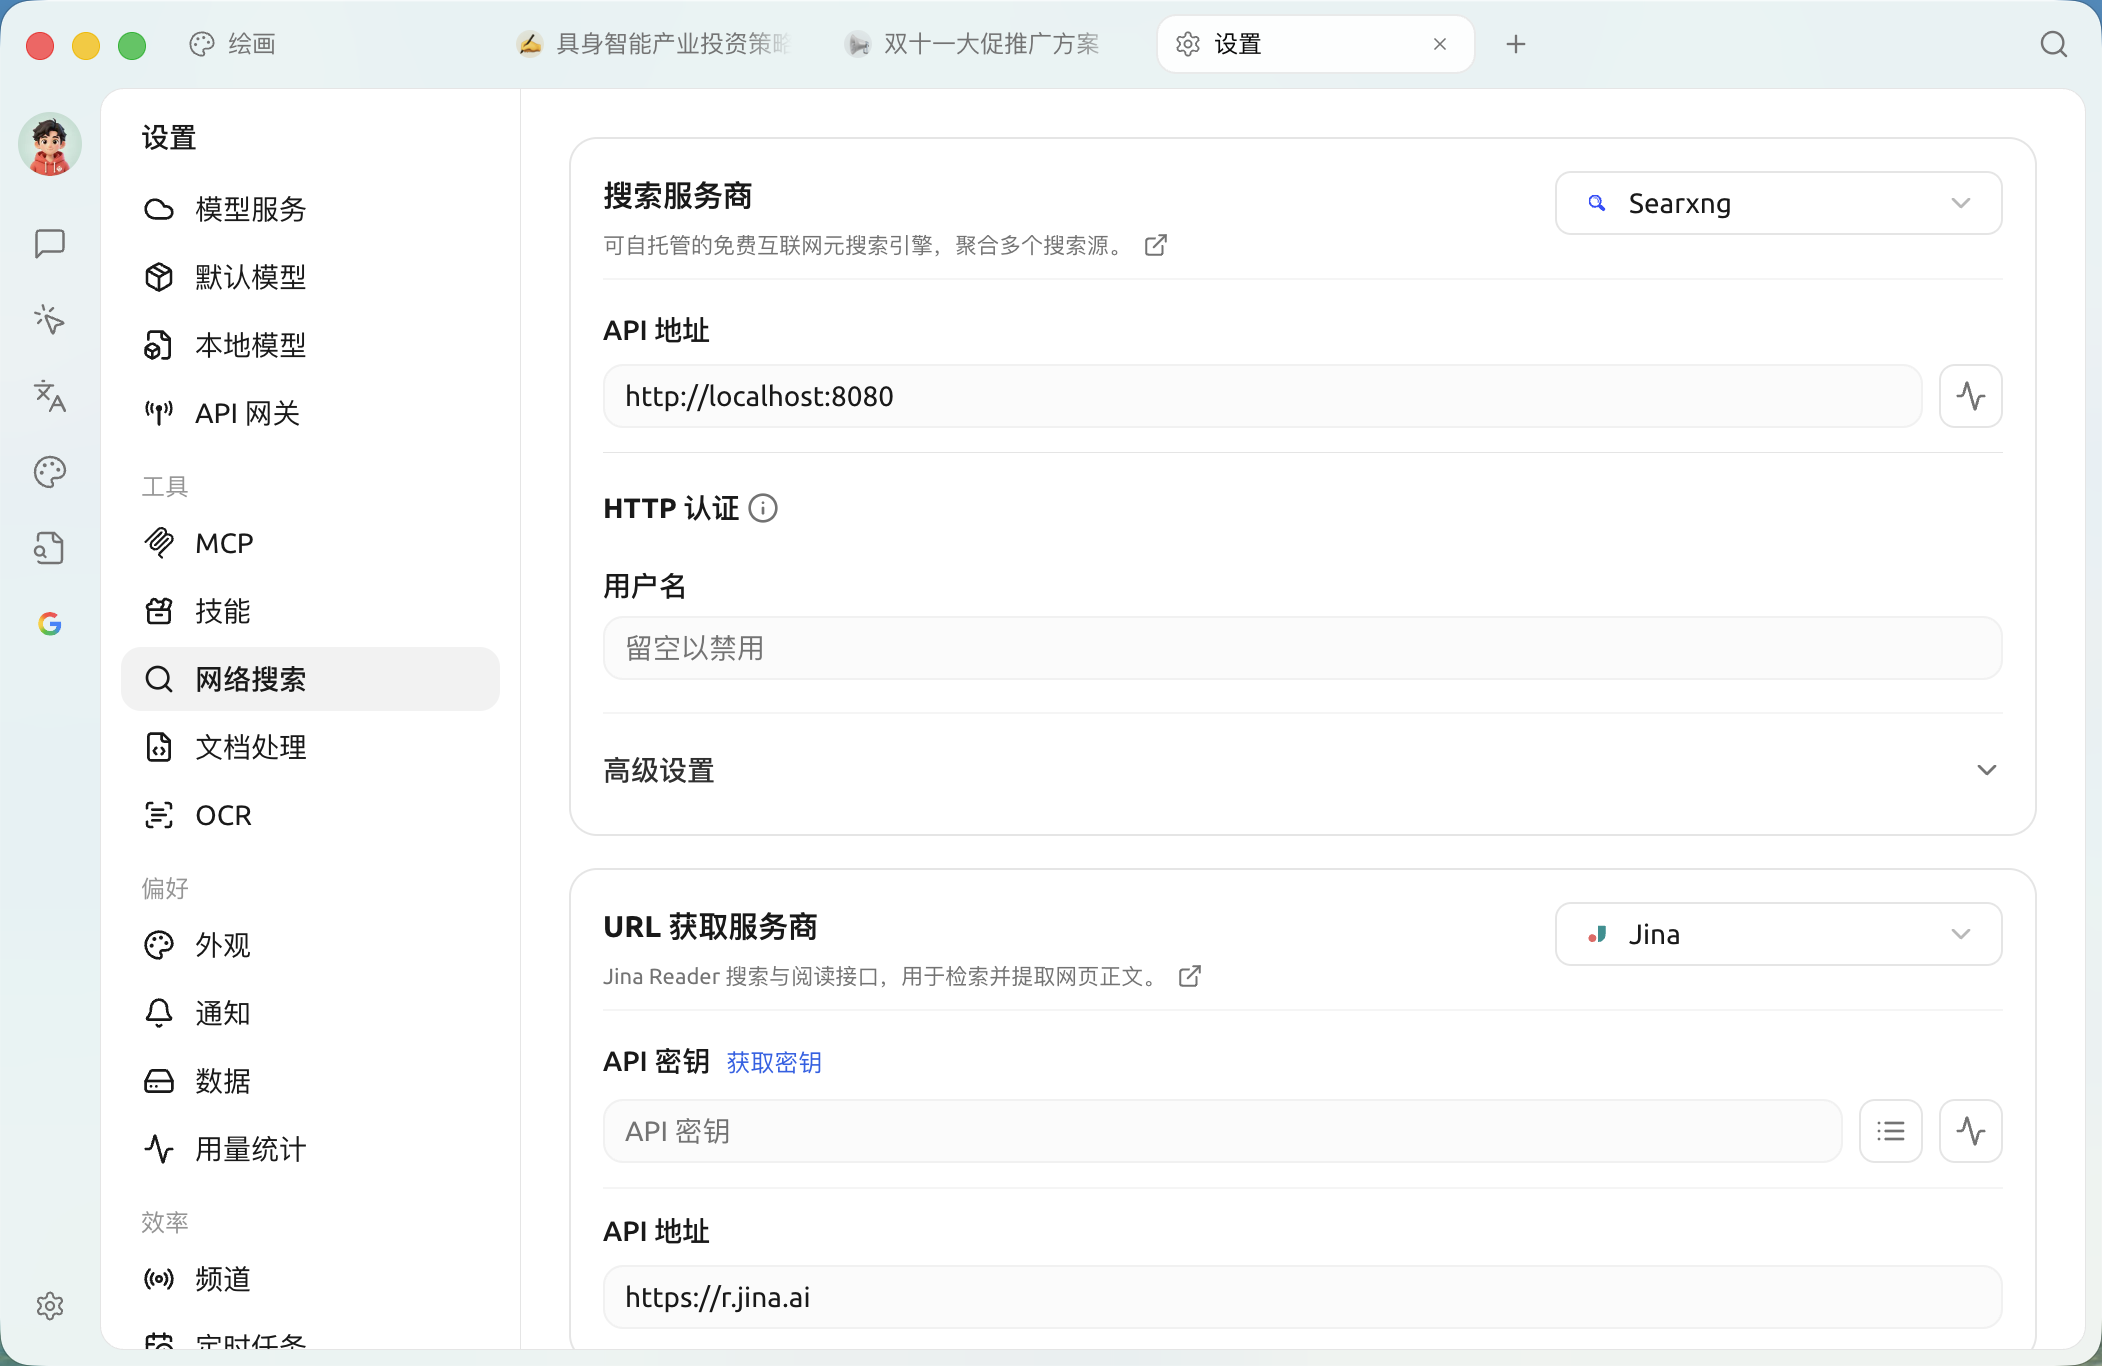 直接輸入本地部署嘅連結發現驗證失敗,呢個時候唔使擔心:
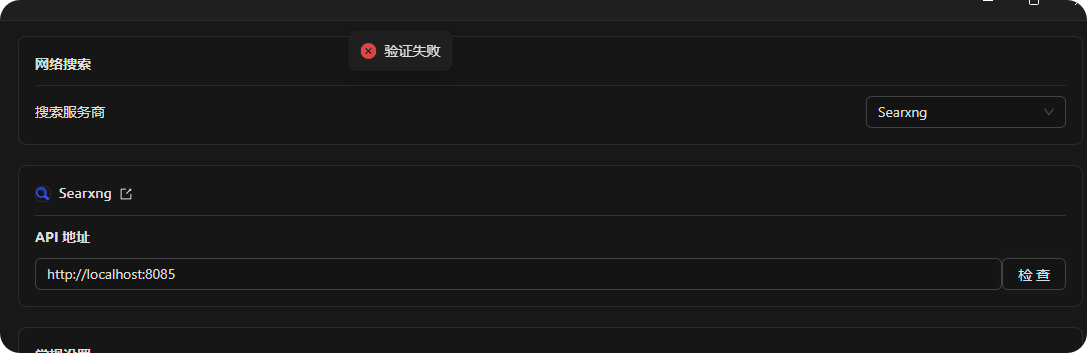 因為直接部署之後預設冇配置 json 返回類型,所以攞唔到數據,需要修改配置檔。
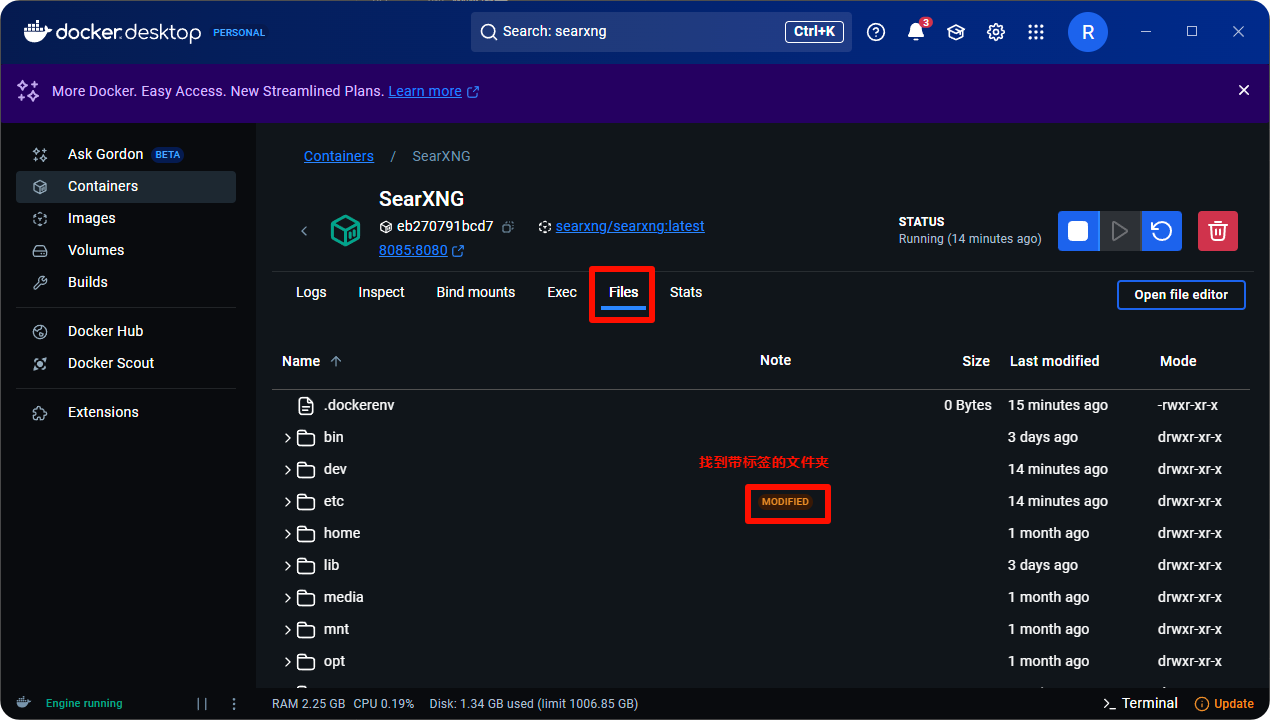
返去 Docker,去到 Files 標籤頁搵到映像入面有標籤嘅資料夾:
因為直接部署之後預設冇配置 json 返回類型,所以攞唔到數據,需要修改配置檔。
返去 Docker,去到 Files 標籤頁搵到映像入面有標籤嘅資料夾:
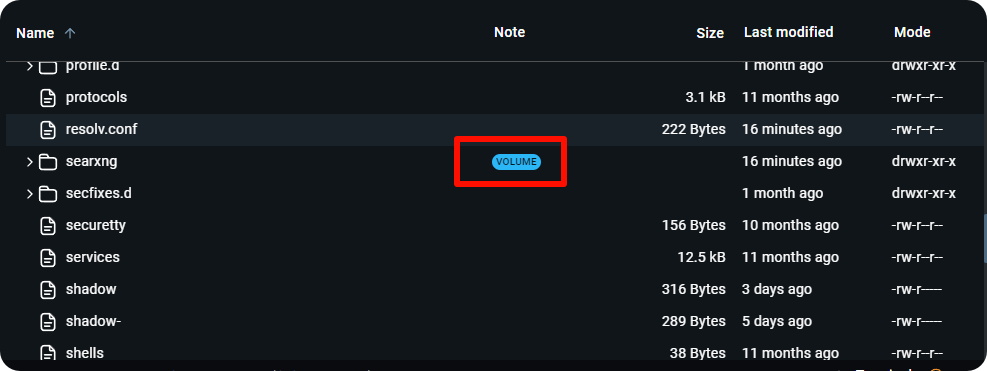
 展開之後繼續向下撳落去,會搵到另一個有標籤嘅資料夾:
 繼續展開,搵到 **settings.yml** 設定檔:
 撳開文件編輯器:
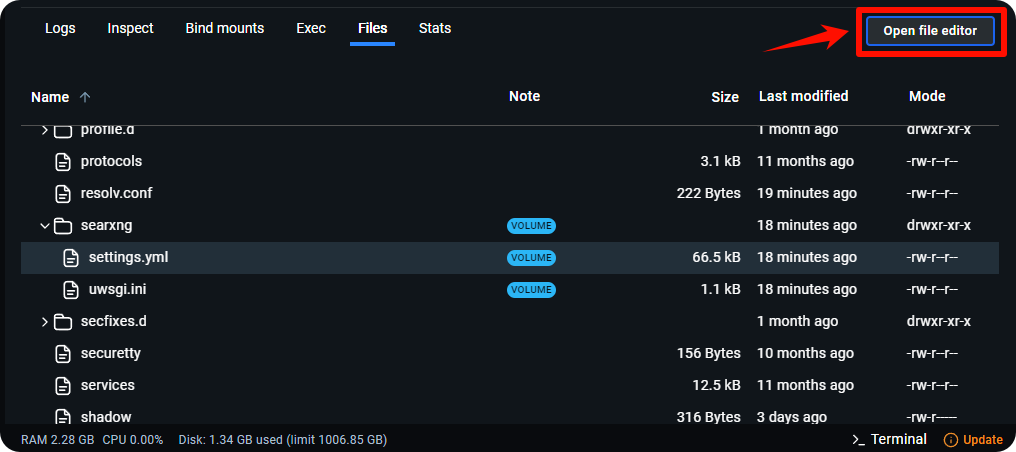 搵到第 78 行,可以見到類型得一個 html
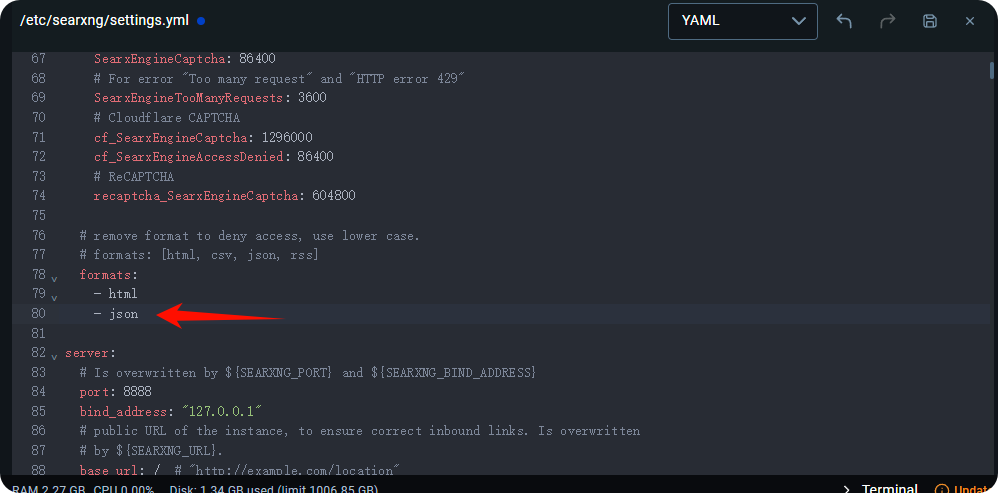
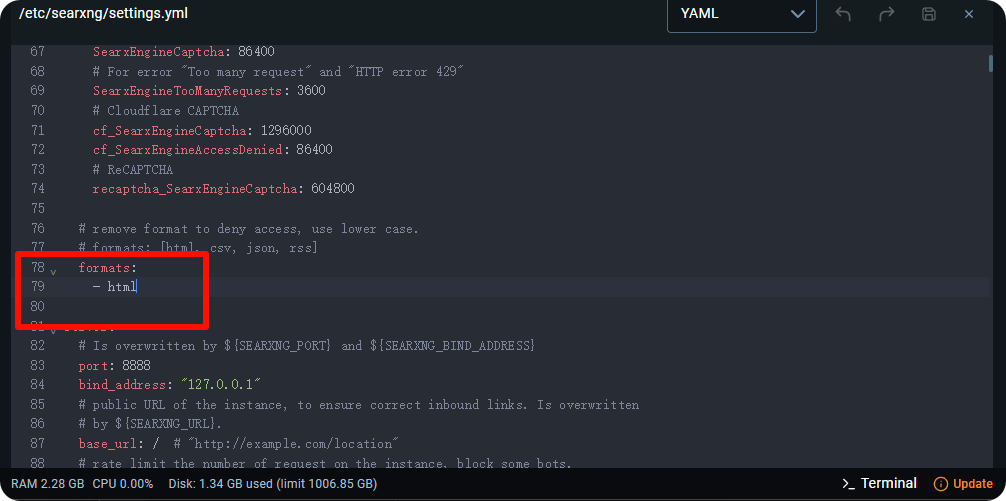 加入 json 類型之後儲存,再次運行映像
 再返去 Cherry Studio 驗證,驗證成功:
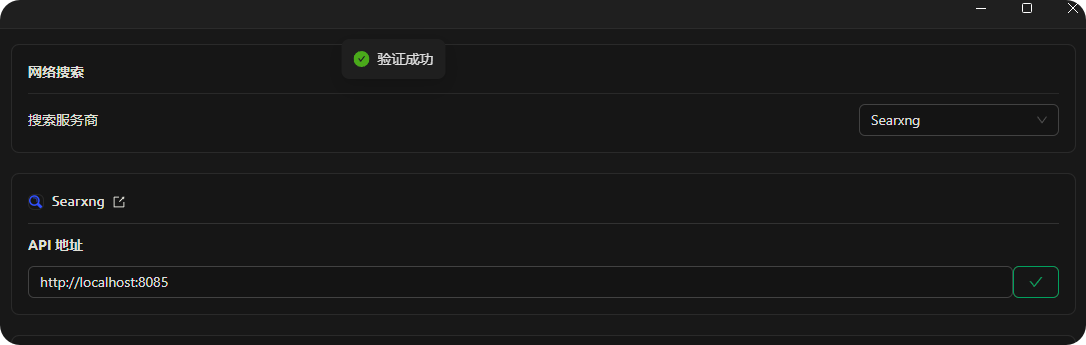 地址可以填本地: : 端口號\n亦可以填 docker 地址: : 端口號
如果使用者跟前面示例喺伺服器上部署並正確配置咗反向代理,已經開咗 json 返回類型。輸入地址後進行驗證,由於已經幫反向代理配置咗 HTTP 基本認證,呢個時候驗證應該會返回 401 錯誤碼:
地址可以填本地: : 端口號\n亦可以填 docker 地址: : 端口號
如果使用者跟前面示例喺伺服器上部署並正確配置咗反向代理,已經開咗 json 返回類型。輸入地址後進行驗證,由於已經幫反向代理配置咗 HTTP 基本認證,呢個時候驗證應該會返回 401 錯誤碼:
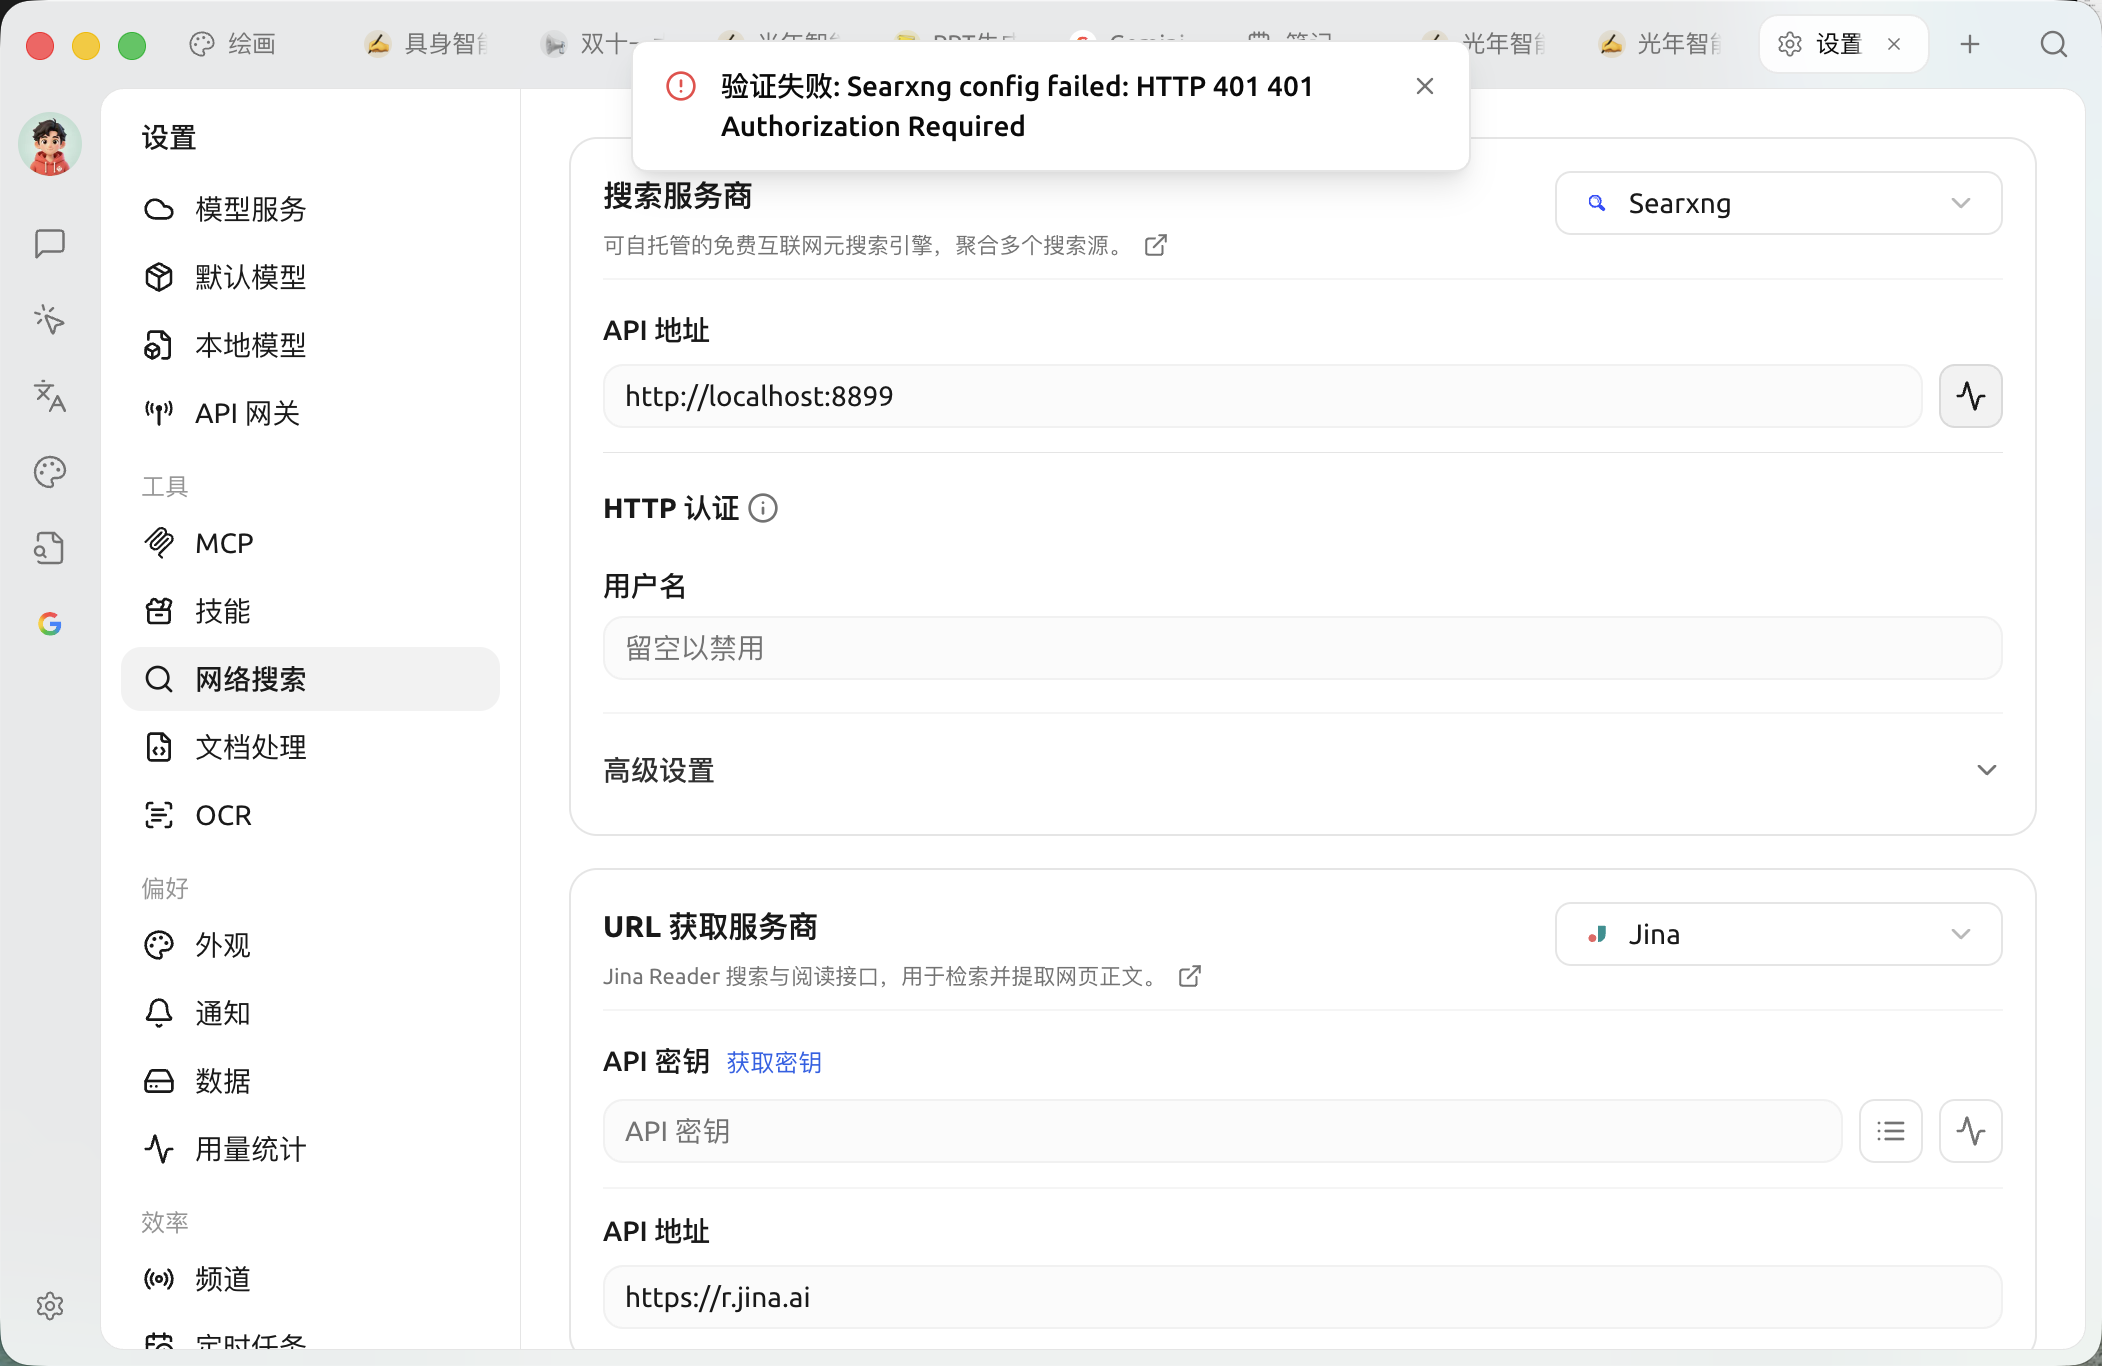 喺客戶端配置 HTTP 基本認證,輸入頭先設定嘅用戶名同密碼:
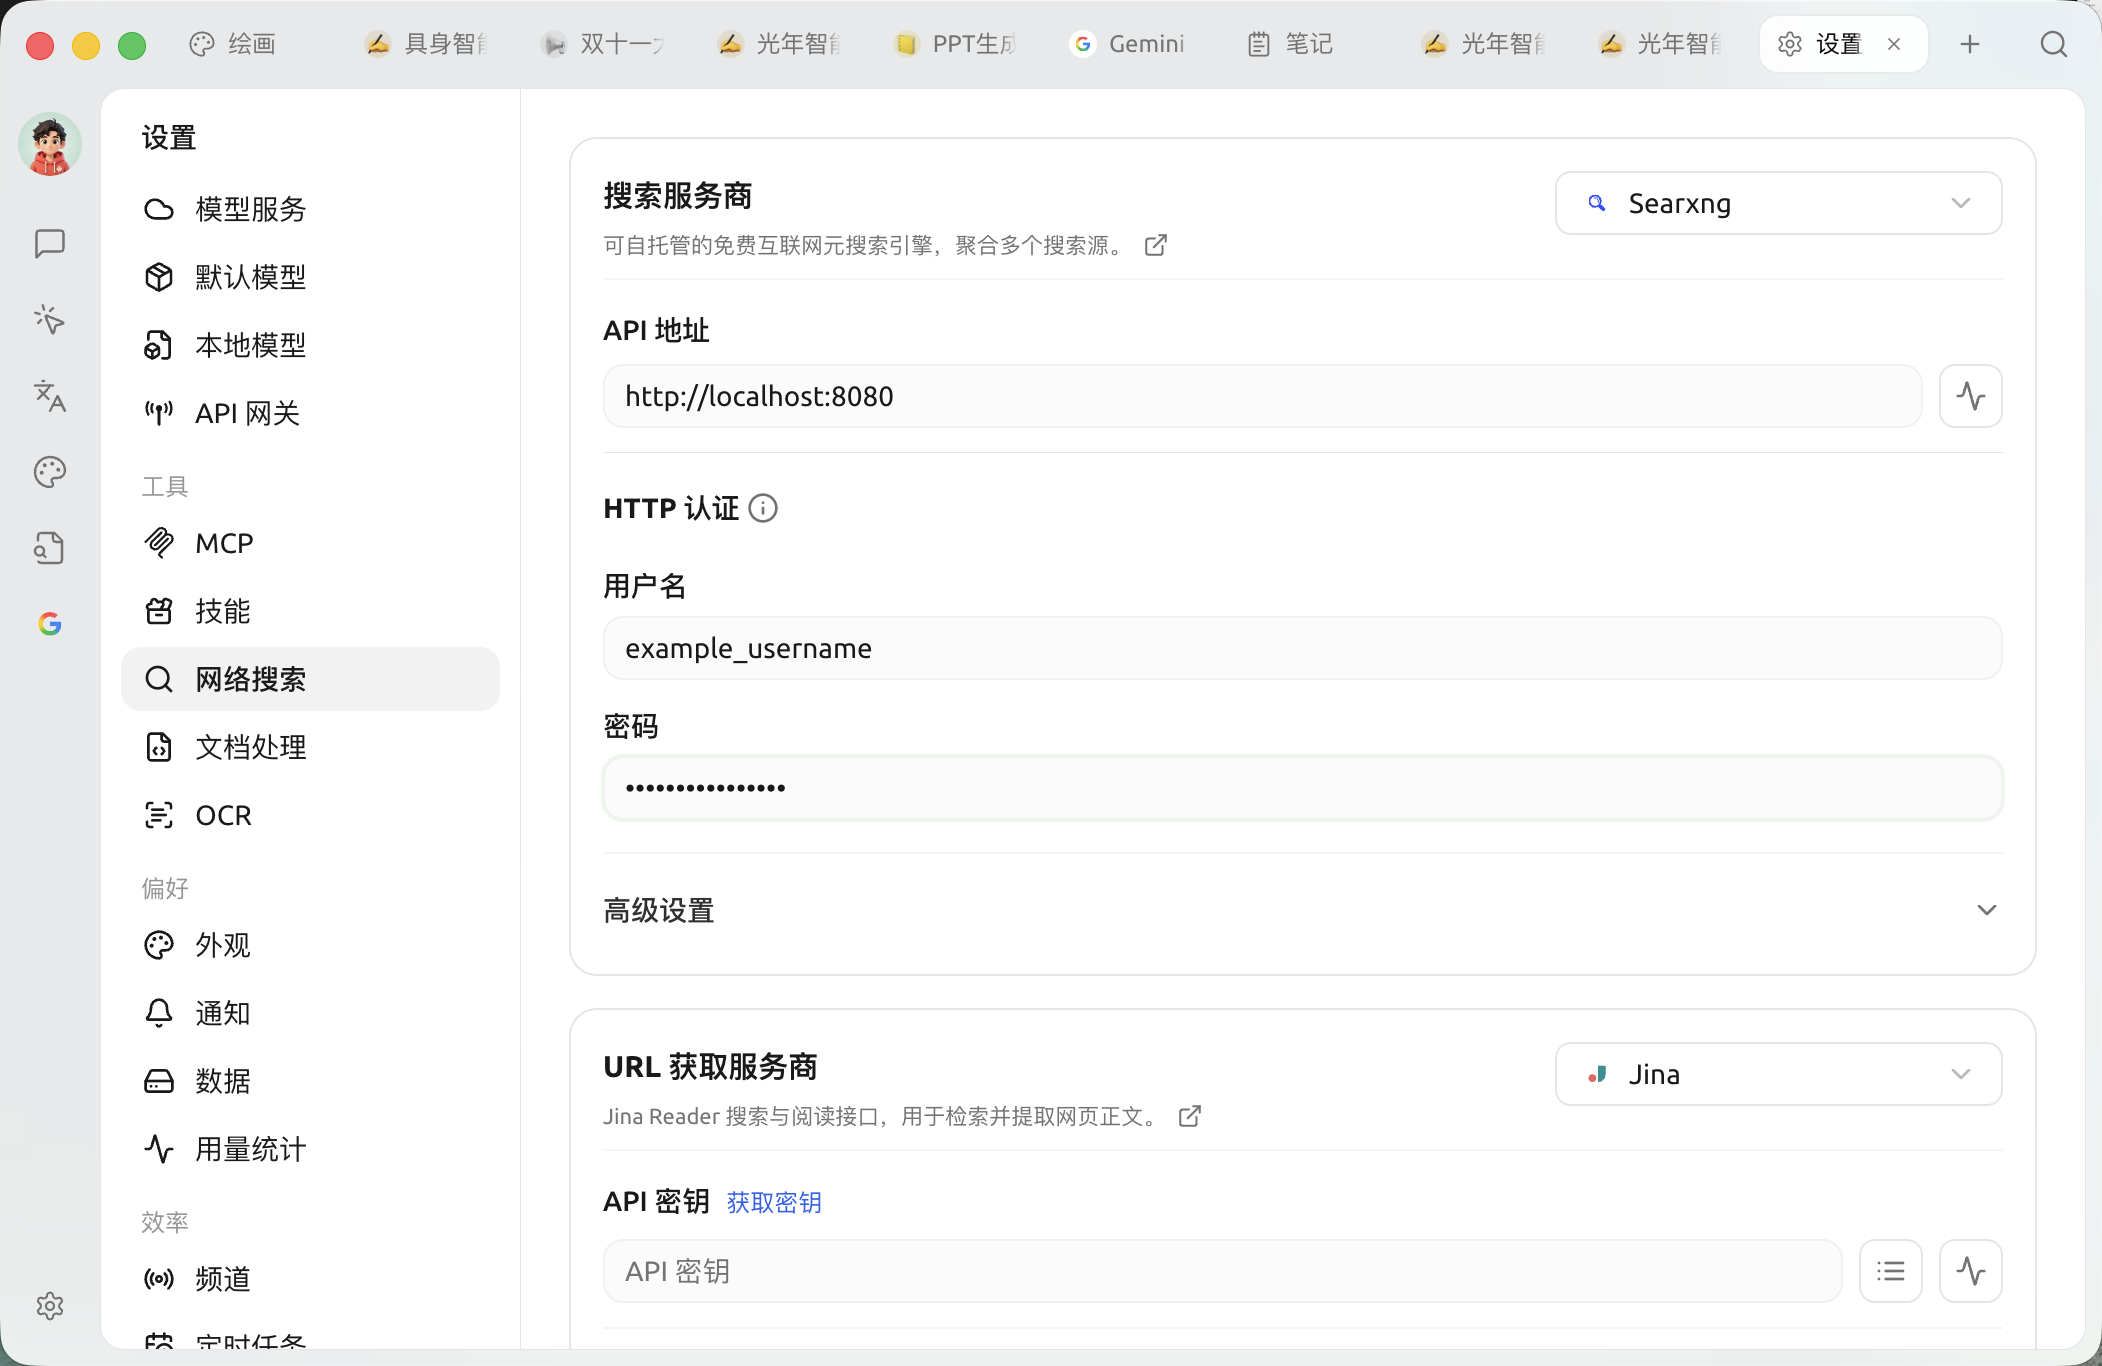 進行驗證,應該會驗證成功。
### 其他配置
呢個時候 SearXNG 已經有預設聯網搜尋能力,如需要自訂搜尋引擎就要自己配置
要留意嘅係,呢度嘅首選項並唔會影響大模型調用時嘅配置
進行驗證,應該會驗證成功。
### 其他配置
呢個時候 SearXNG 已經有預設聯網搜尋能力,如需要自訂搜尋引擎就要自己配置
要留意嘅係,呢度嘅首選項並唔會影響大模型調用時嘅配置
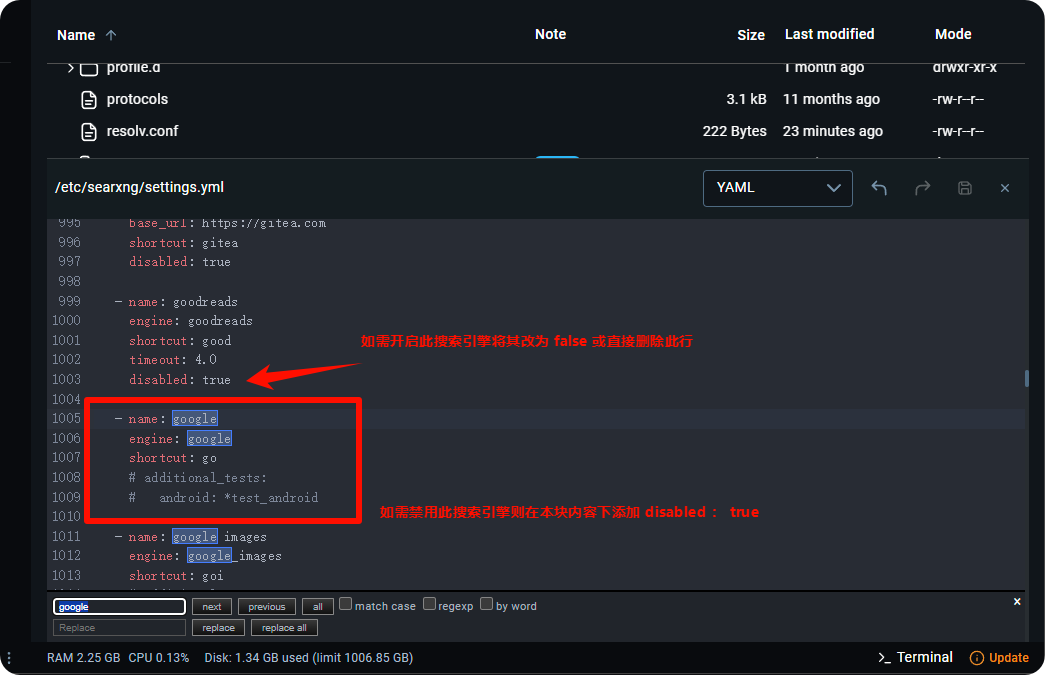
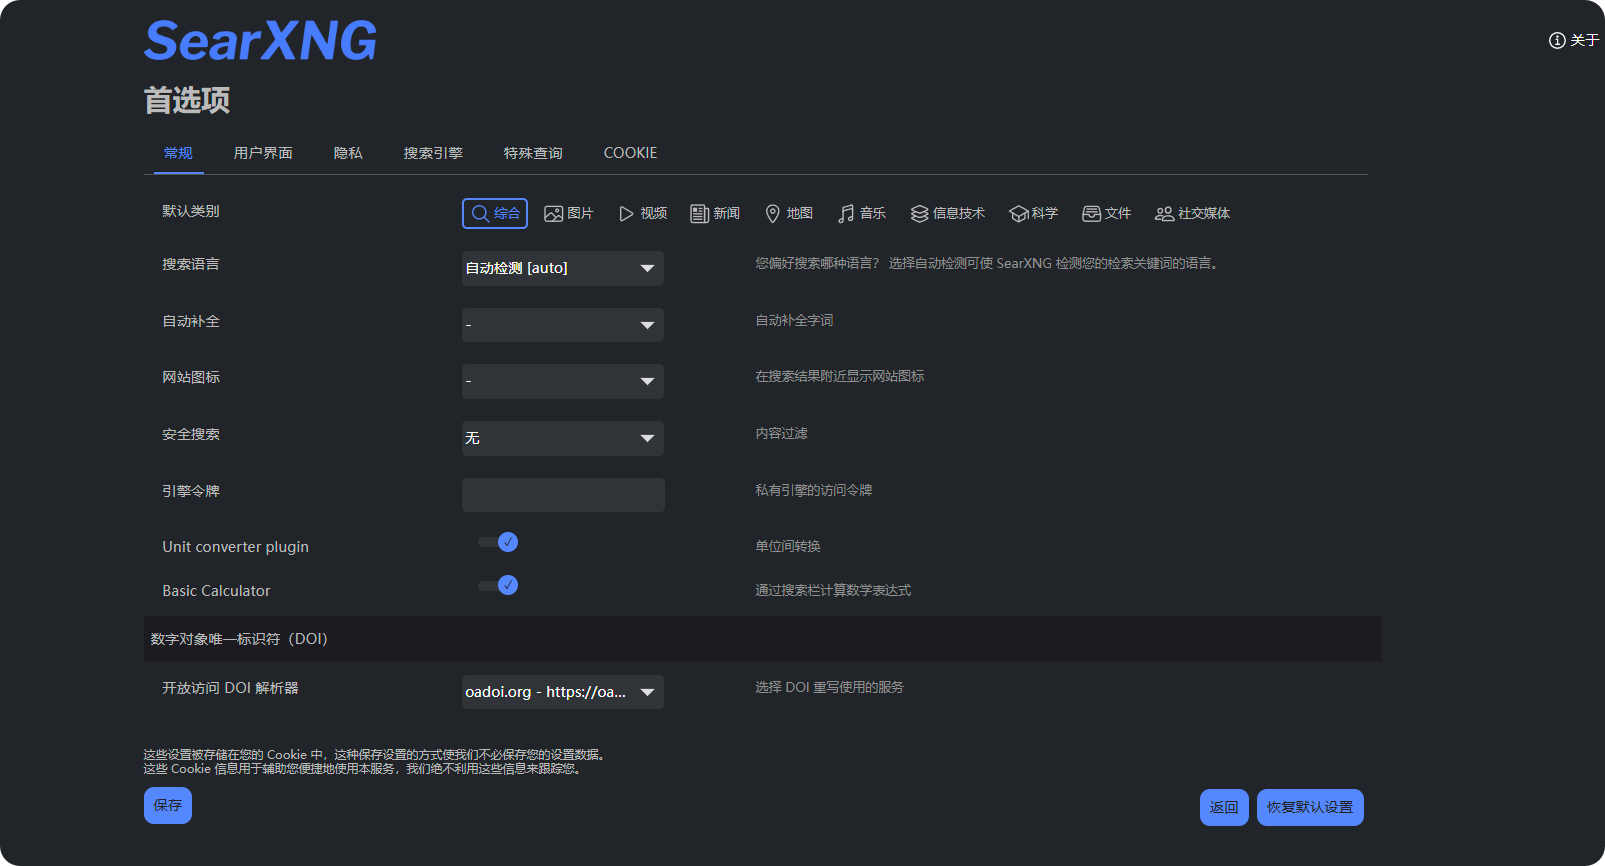 如需配置畀大模型調用嘅搜尋引擎,需要喺配置檔中設定:
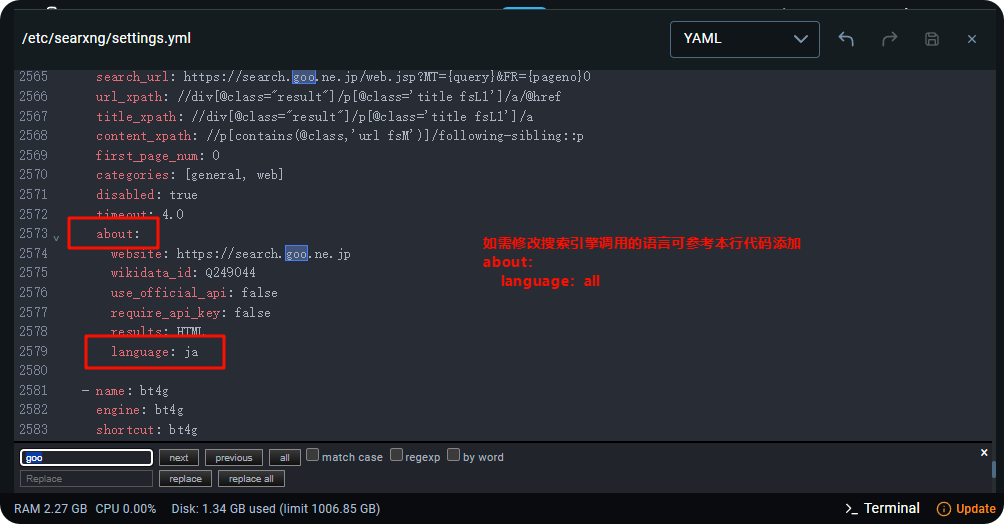 配置語言參考:
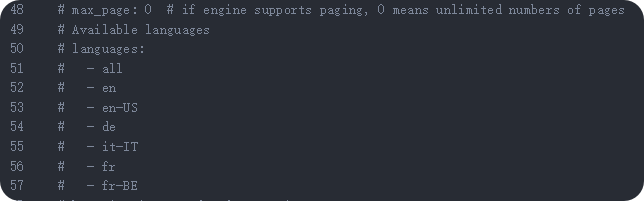 如果內容太長直接修改唔方便,可以將佢複製去本地 IDE,改完之後再貼返入配置檔就得。
## 驗證失敗常見原因
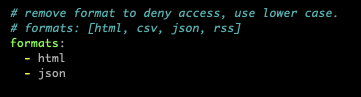
### 返回格式未加 json 格式
喺配置檔入面將返回格式加上 json:
如果內容太長直接修改唔方便,可以將佢複製去本地 IDE,改完之後再貼返入配置檔就得。
## 驗證失敗常見原因
### 返回格式未加 json 格式
喺配置檔入面將返回格式加上 json:
 ### 未正確配置搜尋引擎
Cherry Studio 會預設揀 categories 同時包含 web general 嘅引擎嚟搜尋,預設情況下會揀中 google 等引擎,由於內地無法直接訪問 google 等網站而導致失敗。加以下配置令 searxng 強制使用 baidu 引擎,就可以解決問題:
```
use_default_settings:
engines:
keep_only:
- baidu
engines:
- name: baidu
engine: baidu
categories:
- web
- general
disabled: false
```
### 訪問速度太快
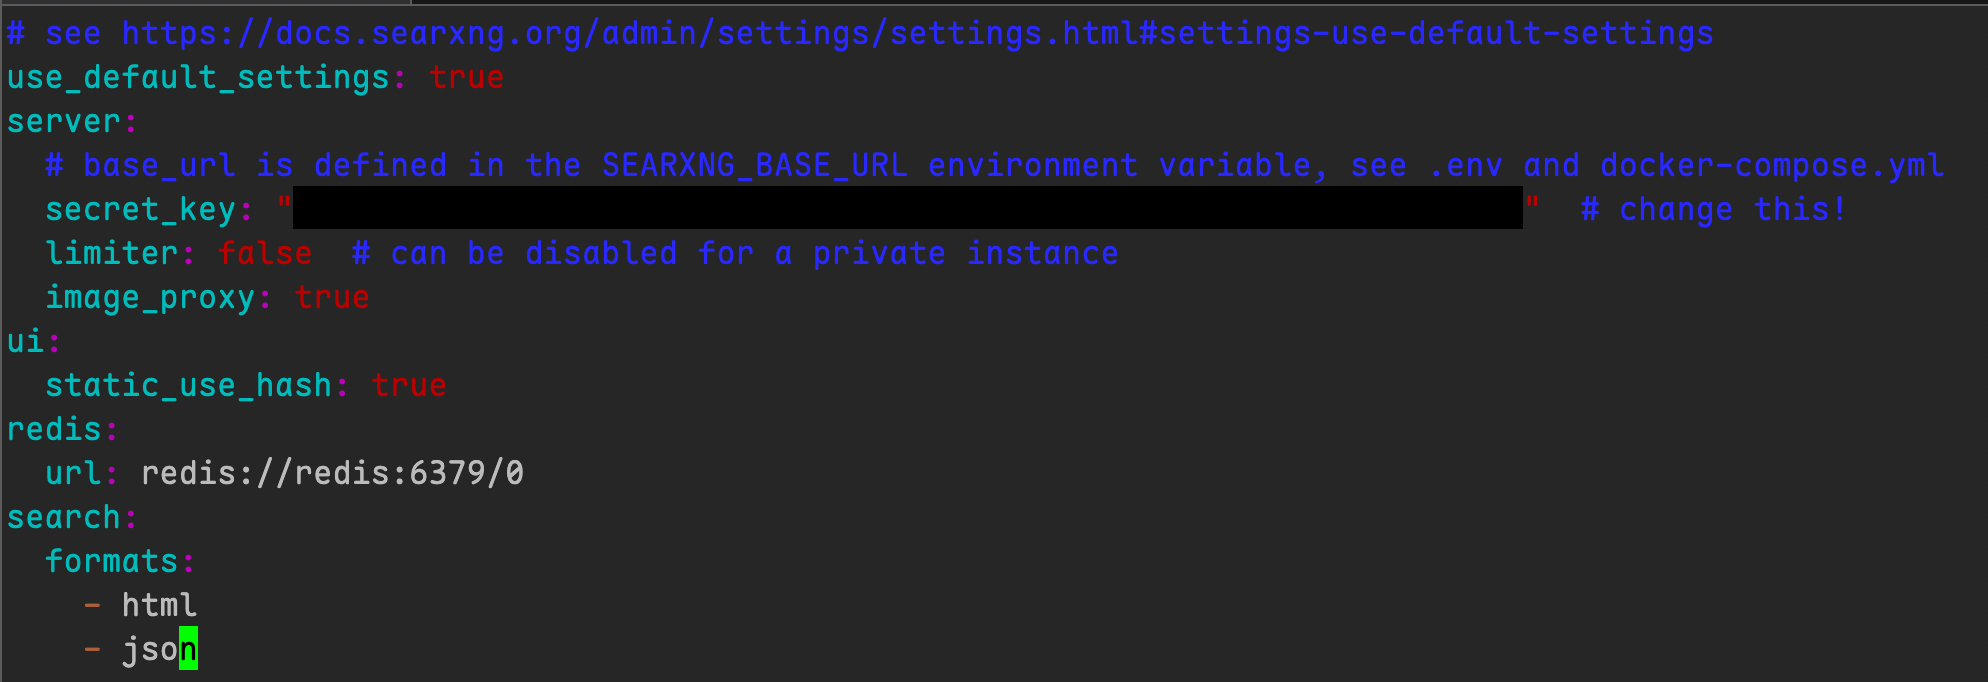
searxng 嘅 limiter 設定阻住咗 API 訪問,請試下喺設定入面將佢設為 false:
### 未正確配置搜尋引擎
Cherry Studio 會預設揀 categories 同時包含 web general 嘅引擎嚟搜尋,預設情況下會揀中 google 等引擎,由於內地無法直接訪問 google 等網站而導致失敗。加以下配置令 searxng 強制使用 baidu 引擎,就可以解決問題:
```
use_default_settings:
engines:
keep_only:
- baidu
engines:
- name: baidu
engine: baidu
categories:
- web
- general
disabled: false
```
### 訪問速度太快
searxng 嘅 limiter 設定阻住咗 API 訪問,請試下喺設定入面將佢設為 false:
 ***
### 攞幫助同提交意見
如果您喺配置或使用過程中遇到任何疑問、Bug 或有功能改善建議,請參考 [反饋與建議](/docs/zhong-wen-fan-ti/question-contact/suggestions.md) 入面提供嘅官方渠道。
---
# Agent Instructions
This documentation is published with GitBook. GitBook is the documentation platform designed so that both humans and AI agents can read, navigate, and reason over technical content effectively. Learn more at gitbook.com.
## Querying This Documentation
If you need additional information that is not directly available in this page, you can query the documentation by asking a question.
Perform an HTTP GET request on the following URL with the `ask` and `goal` query parameters:
```
GET https://docs.cherryai.com.cn/docs/zhong-wen-fan-ti/pre-basic/settings/websearch/searxng.md?ask=&goal=
```
`ask` is the immediate question: it should be specific, self-contained, and written in natural language.
`goal` is what the user is ultimately trying to achieve, the reason they need the answer. Sharing it helps GitBook give you a better, more relevant answer. A goal is most helpful when it describes the outcome the user wants rather than restating the question. For example, with `ask=how do I create an API token`, a goal like `automate deployments from our CI pipeline` lets GitBook tailor the answer to that use case.
The response will contain a direct answer to the question and relevant excerpts and sources from the documentation.
Use this mechanism when the answer is not explicitly present in the current page, you need clarification or additional context, or you want to retrieve related documentation sections.
***
### 攞幫助同提交意見
如果您喺配置或使用過程中遇到任何疑問、Bug 或有功能改善建議,請參考 [反饋與建議](/docs/zhong-wen-fan-ti/question-contact/suggestions.md) 入面提供嘅官方渠道。
---
# Agent Instructions
This documentation is published with GitBook. GitBook is the documentation platform designed so that both humans and AI agents can read, navigate, and reason over technical content effectively. Learn more at gitbook.com.
## Querying This Documentation
If you need additional information that is not directly available in this page, you can query the documentation by asking a question.
Perform an HTTP GET request on the following URL with the `ask` and `goal` query parameters:
```
GET https://docs.cherryai.com.cn/docs/zhong-wen-fan-ti/pre-basic/settings/websearch/searxng.md?ask=&goal=
```
`ask` is the immediate question: it should be specific, self-contained, and written in natural language.
`goal` is what the user is ultimately trying to achieve, the reason they need the answer. Sharing it helps GitBook give you a better, more relevant answer. A goal is most helpful when it describes the outcome the user wants rather than restating the question. For example, with `ask=how do I create an API token`, a goal like `automate deployments from our CI pipeline` lets GitBook tailor the answer to that use case.
The response will contain a direct answer to the question and relevant excerpts and sources from the documentation.
Use this mechanism when the answer is not explicitly present in the current page, you need clarification or additional context, or you want to retrieve related documentation sections.