Chat - Assistant
The chat interface is the page used most often in Cherry Studio, but its structure includes two levels: Assistant → Chat. Understanding this structure helps you use various chat features more efficiently.
If you still can't tell the difference between concepts like assistants, agents, and skills, you can first look at the Assistant Library section and the agent page.
The relationship between assistants and chats
Simple analogy:
Assistant = a role(such as "product documentation assistant" or "code reviewer")
Chat = a conversation with that role(for example, discussing a "refactoring plan" on Monday and a "bug report" on Tuesday)
That is to say:Multiple chats can be created under one assistant, and all chats share that assistant's persona and parameters (prompt, model, temperature, etc.), so there is no need to reset the AI's role and style each time.
Assistant
An assistant sets a fixed role for the AI — composed of a system prompt + preset model parameters.
System default assistant: a general-purpose assistant with no special prompt set; can be used directly
More specialized assistants: below Assistant Library browse ready-made presets, or create your own
Chat
Multiple chats can be created under each assistant (that is, multiple independent conversations). Chats are independent of one another, but they share the settings of their assigned assistant.
Example use cases:
Under the same "code assistant," open two separate chats for "Project A refactoring" and "Project B bugs" to manage them independently
Open multiple chats under the same "translation assistant" to handle different articles separately

Assistant Library
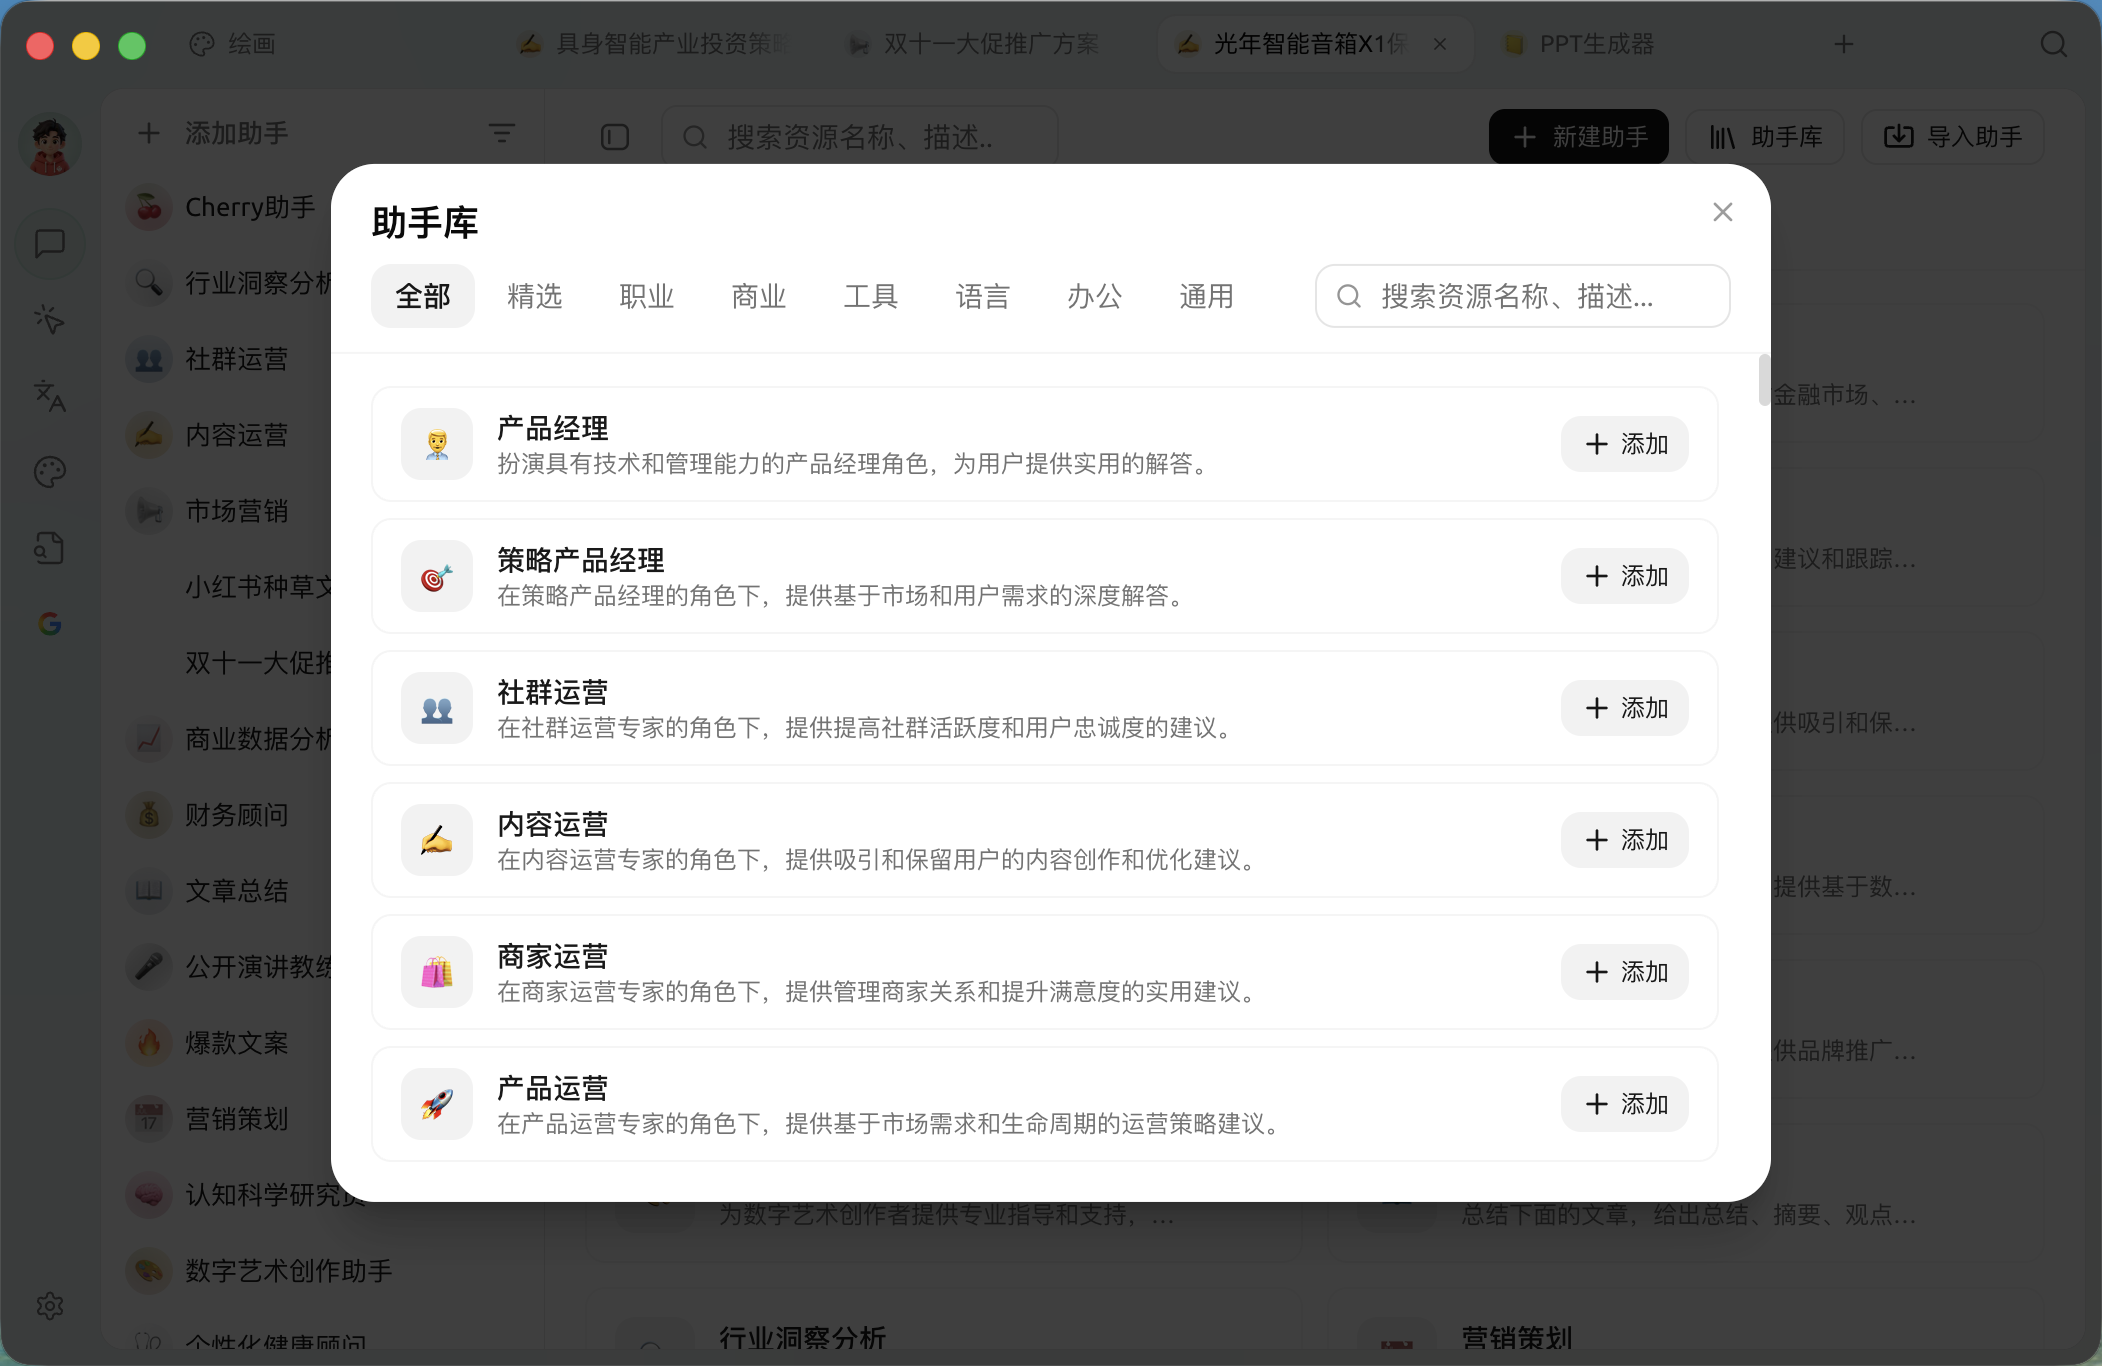
Where do the assistants in the assistant list come from? In addition to the system default assistant, you can Assistant Library add them from the Assistant Library, or create your own. The Assistant Library is an assistant preset marketplace, providing many "role + prompt + parameters" templates; after adding one, it will appear in the assistant list on the chat page.
Don't confuse this with agents: what the Assistant Library produces is the above-mentioned Chat assistant(a role preset);agent(entry [Launchpad] → [Work]) is another system that can autonomously call tools, read and write files, and complete tasks across steps. They are different things, and their configuration entry points are also different: assistants are managed on the chat page, while agents are in [Work].
Enter the Assistant Library
At the top of the assistant list on the left side of the chat page, click display method the icon (funnel-shaped), and select [Manage Assistants] from the pop-up menu.
On the top-right of the opened "Manage Assistants" page, click the [Assistant Library] button to enter the assistant preset marketplace.

Find assistants in the Assistant Library
Category filters: by
All/Featuredand multiple usage categories (career, business, tools, language, office, general, writing, programming, emotion, education, creativity, academic, design, art, entertainment, life, etc.); the number beside each category name is the number of assistants in that categorySearch: the search box at the top can search across all categories by keyword
Preview: click an assistant card to view that assistant's system prompt, recommended model, and parameter presets
Add to My Assistants
Click the Add button on an assistant card to add that preset to your assistant list
After that, you can see the assistant in the assistant list on the chat page
Create your own assistant
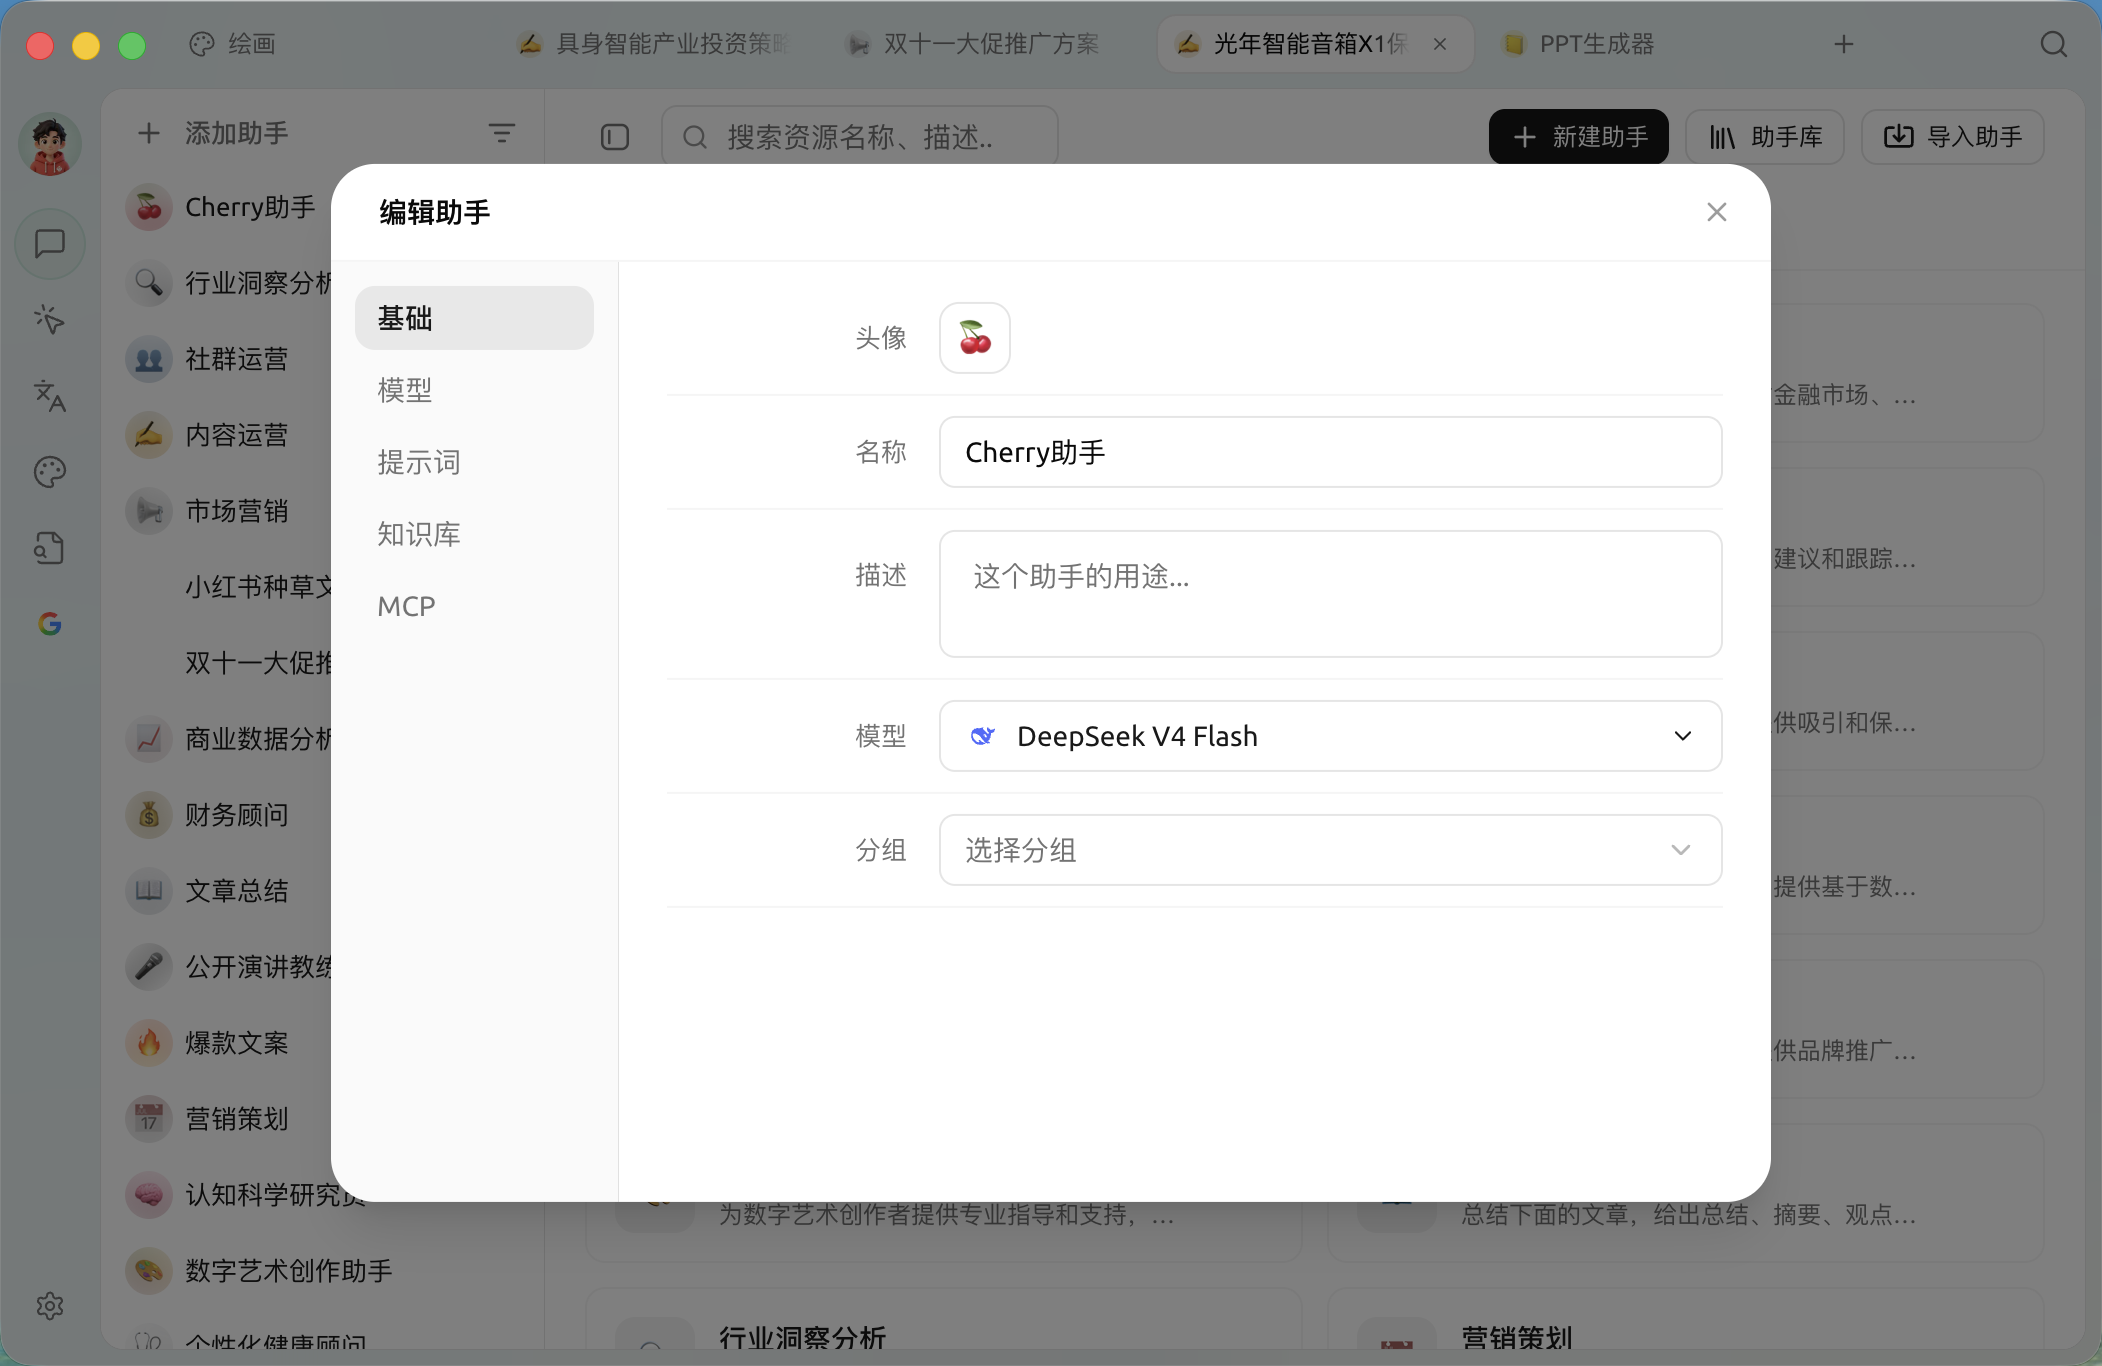
Click [New Assistant] in the top-right corner of the "Manage Assistants" page, and the Edit Assistant dialog will open, where you can fill in the following tabs:
Basic: avatar, name, description, the assistant's default model, group
Model: model parameters such as temperature, Top-P, maximum token count, etc. (see Assistant settings)
Prompt: determines the assistant's role and behavior; the lightning button in the upper-right of the input box is [AI Optimize Prompt], which can use the global default assistant model to rewrite the current content in a more structured way
Knowledge base: link an existing Knowledge base
MCP: enable MCP tools for this assistant

Model selection: you can Basic assign a default model for the assistant in the global default chat model.
Import and manage
The top-right of the "Manage Assistants" page provides three action buttons:
New Assistant: open the Edit Assistant dialog : create an assistant from scratch
Assistant Library: enter the assistant preset marketplace introduced above
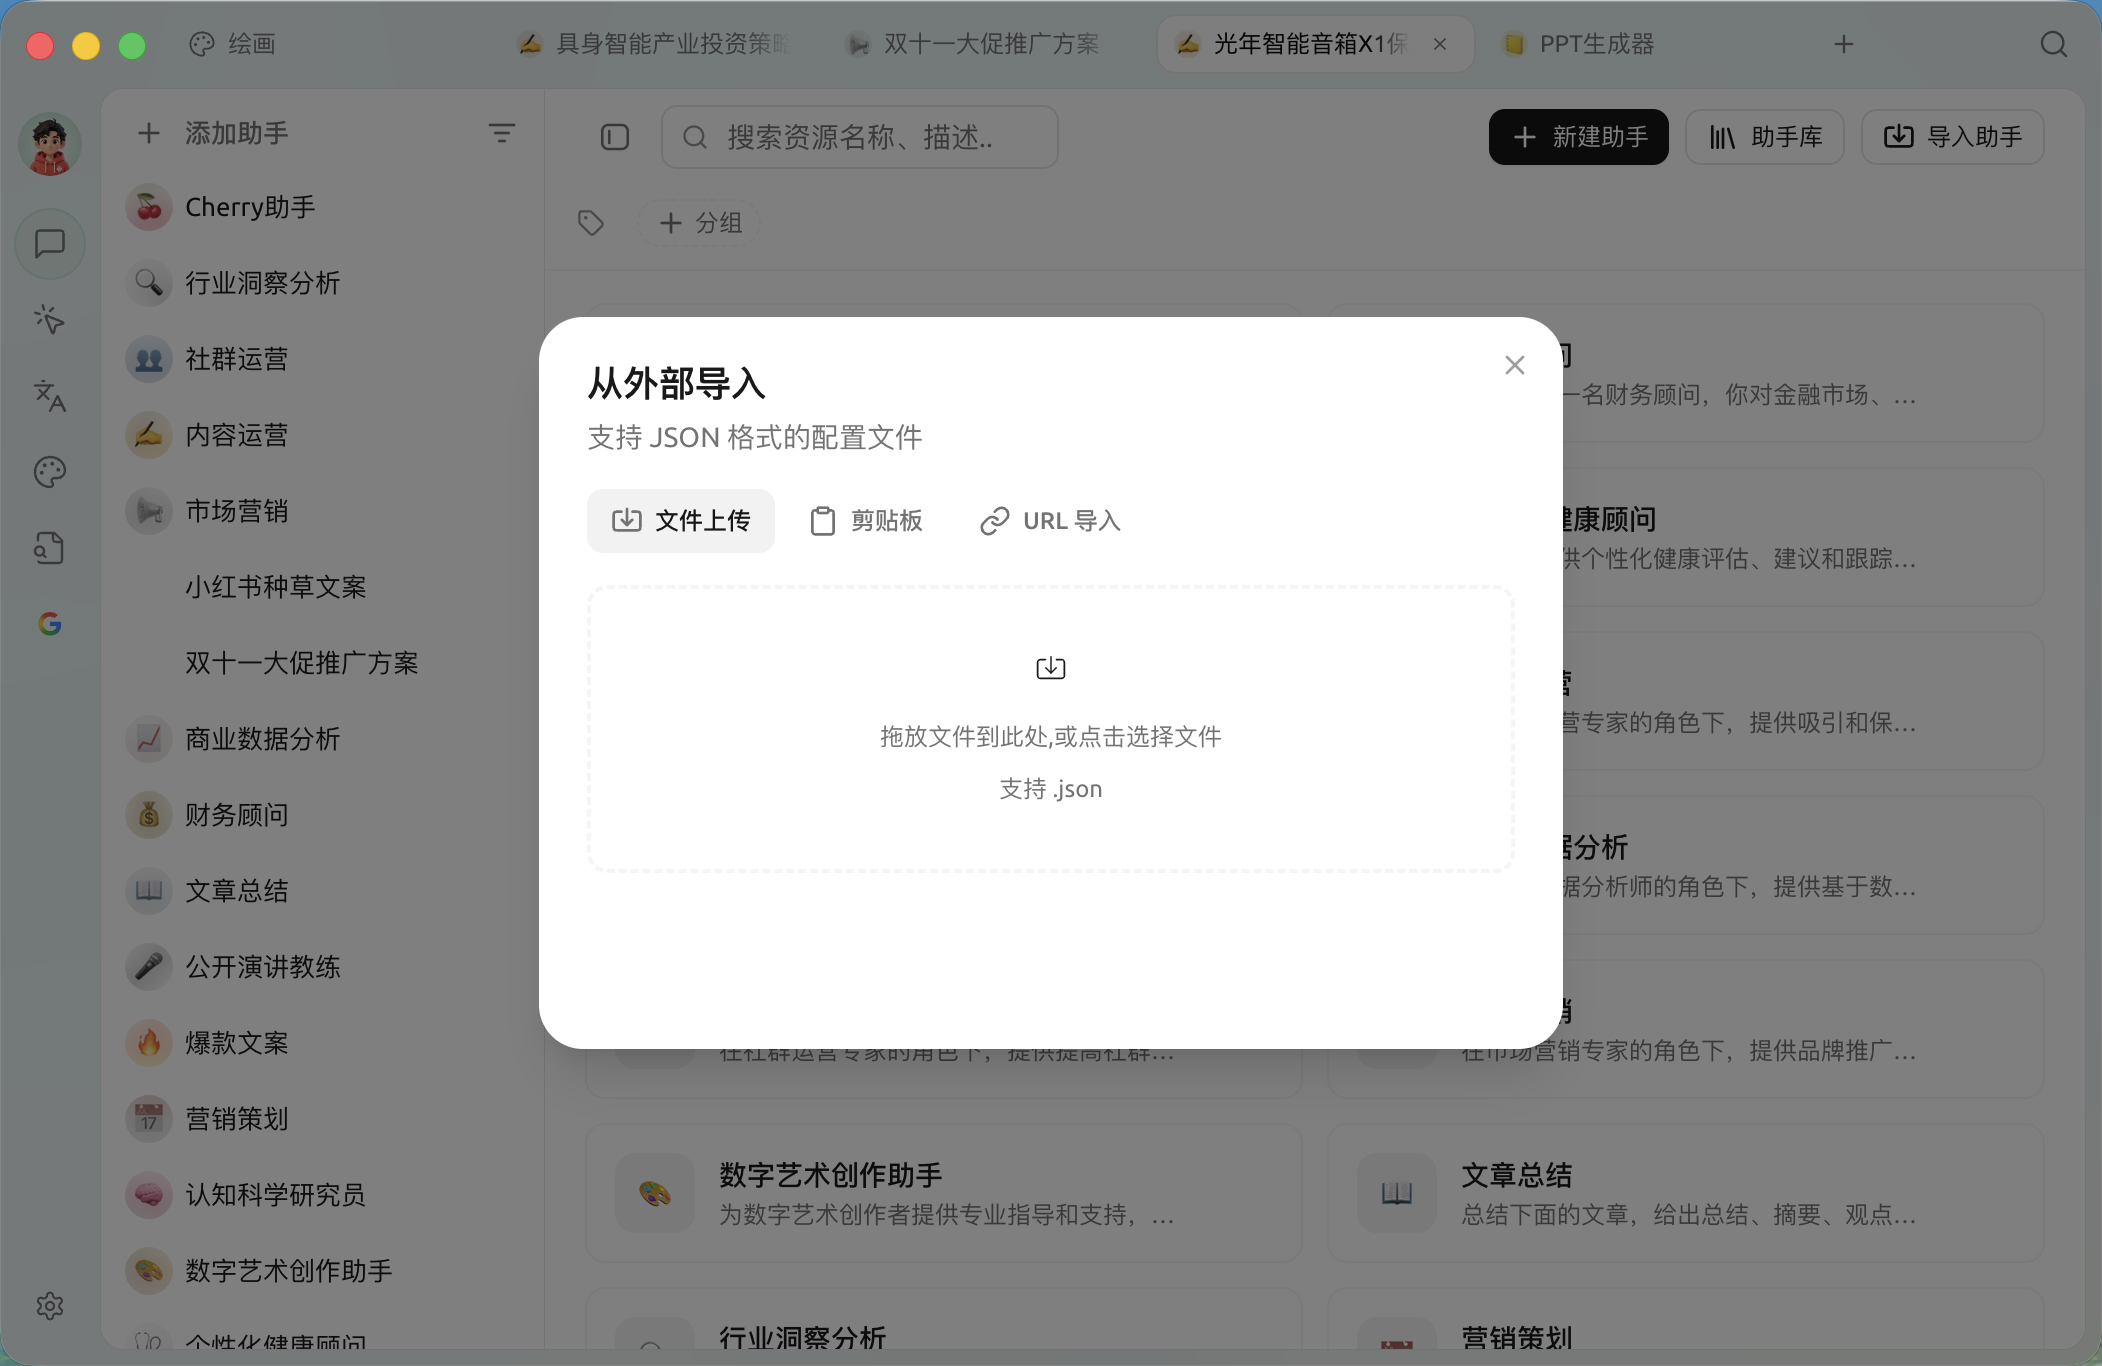
Import Assistant: open the "Import from External" dialog to import assistants shared by others
The "Manage Assistants" page itself is used to centrally manage added assistants and supports batch deletion and batch export.
The [Import from External] dialog provides three one-time import methods; after import, the assistant will appear in your assistant list:
File upload: drag in or select a JSON file
Clipboard: paste the assistant's JSON text directly
URL import: enter a JSON link (for security reasons, currently only sources such as GitHub Gist and raw.githubusercontent.com are supported)

When to use the Assistant Library, and when to use agents?
Personalized "role" for quick conversations (writing, translation, technical Q&A, etc.)
Assistant Library
Let the AI autonomously call tools, read and write files, and complete tasks across steps
Scheduled execution, cross-platform message push
Agent + Scheduled tasks + Channels
buttons inside the dialog

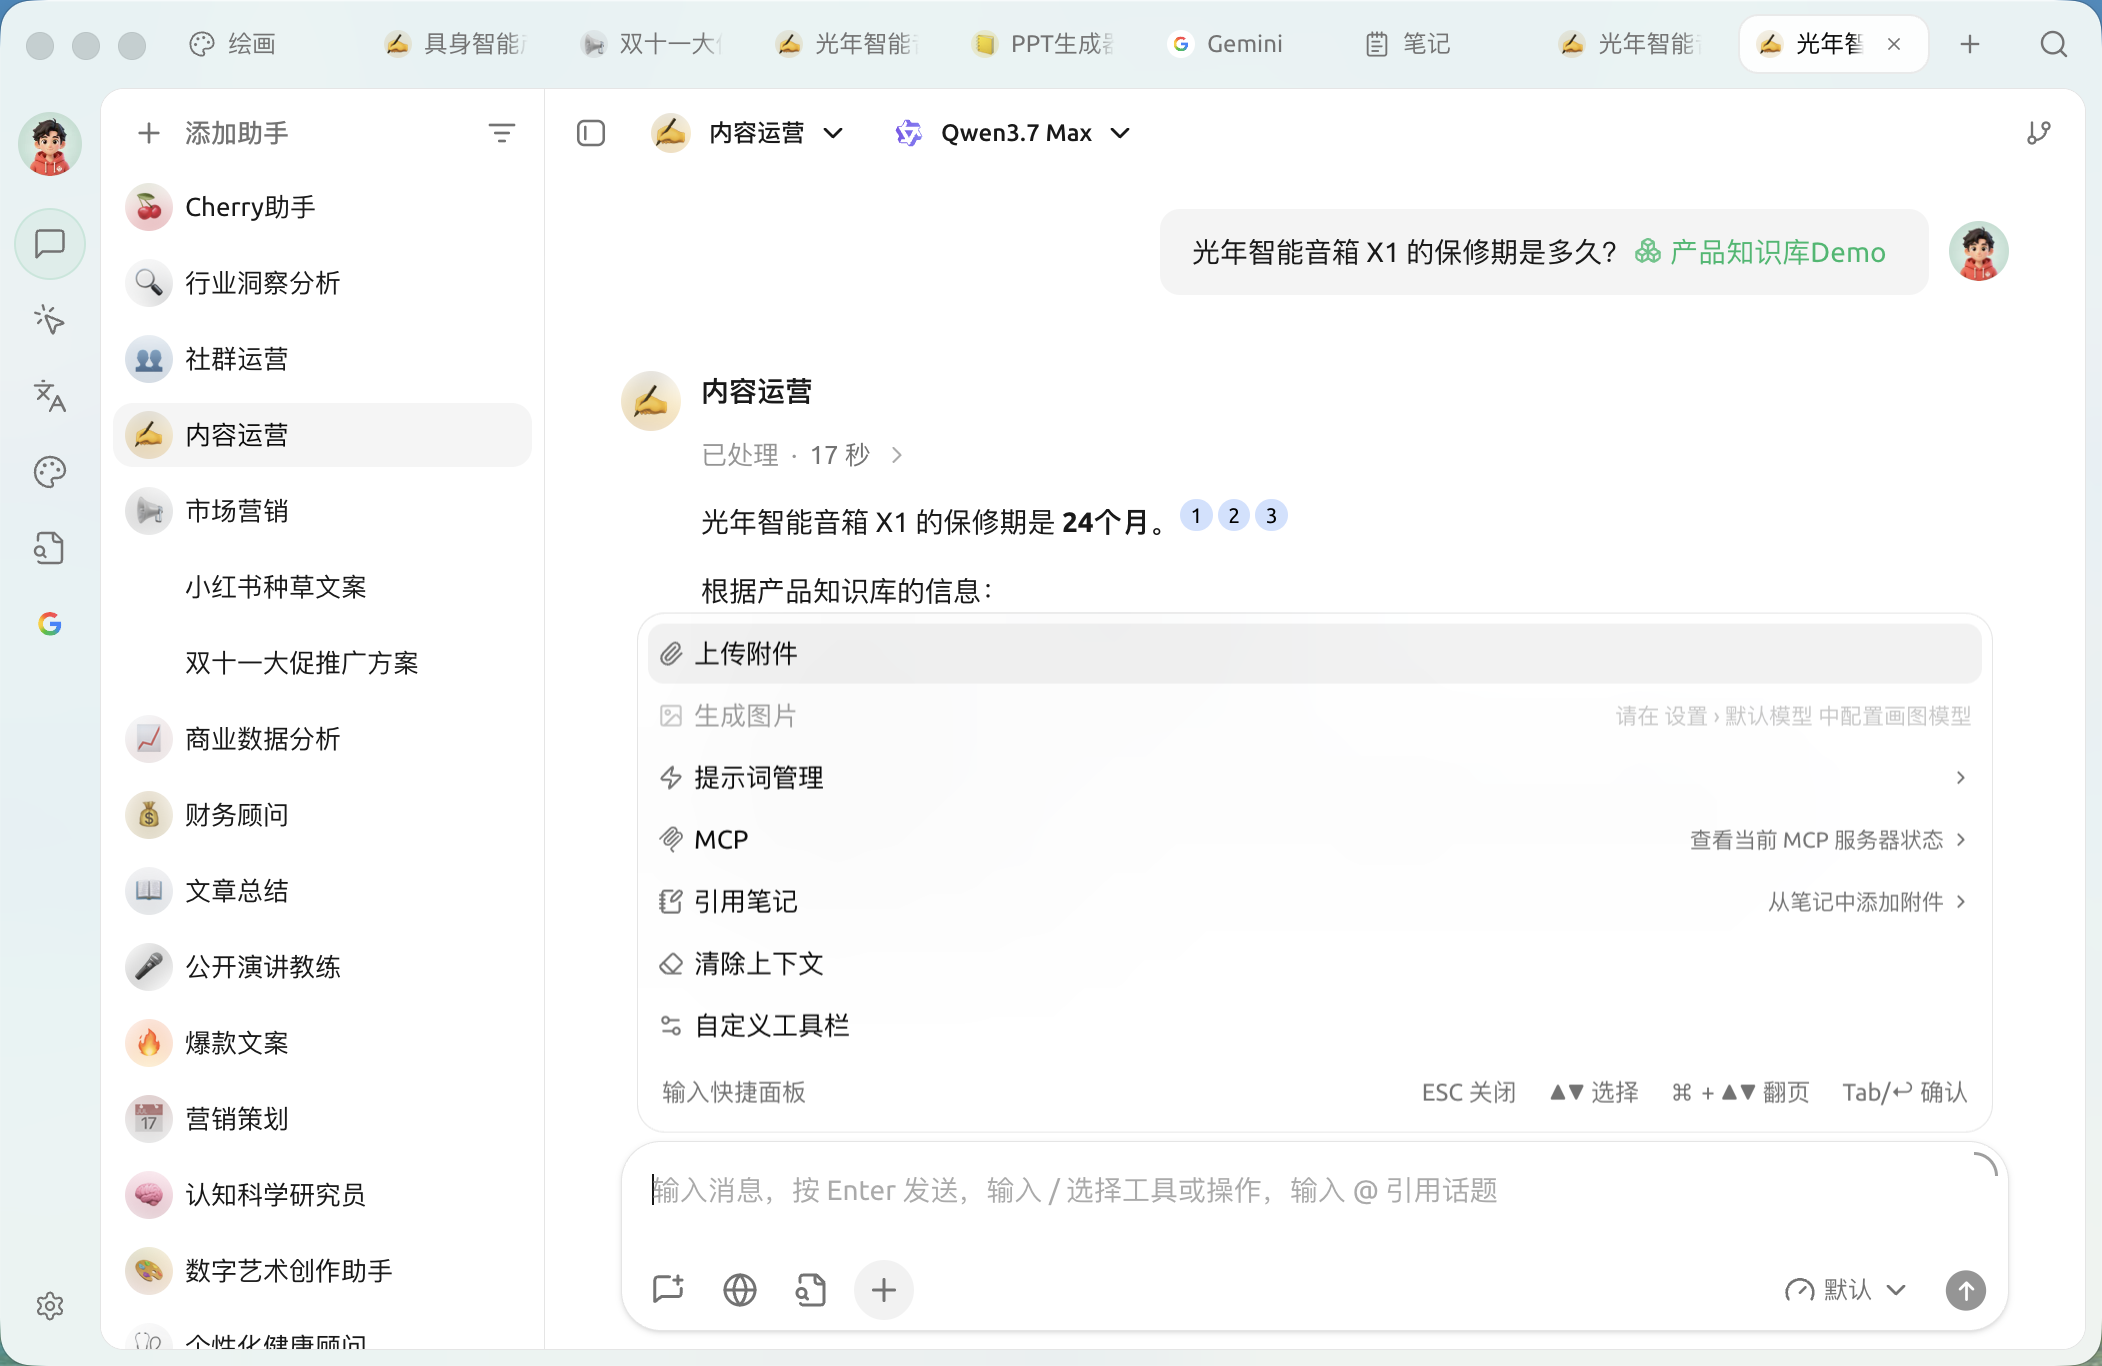
The toolbar below the input box shows only 4 common tools by default, and the rest are collected in the trailing [+] input shortcut panel . If you want to change which tools are shown by default, click [+] → [Customize Toolbar].
Default toolbar
New chat
Create a new chat within the current assistant
Web search
Return web search results as context to the model; you need to configure this in Network Mode first; some models can also switch to "model built-in" search
Knowledge base
an already created Knowledge base as context
+ (input shortcut panel)
opens this group of additional tools and actions below
Input shortcut panel (+)
Click +, or if you directly type in the input box /, this panel will open. The panel supports ↑↓ selection,Tab / Enter to confirm,ESC to close.
Upload attachment
Upload images or documents; images require the model to support vision, and documents will be parsed as context
Generate image
Let the current conversation model generate an image; you need to configure a drawing model first in [Settings] → [Default Model]. For dedicated image generation, go to Drawing
Prompt management
Insert and manage preset prompts; see Input toolbar and productivity tools
MCP
View and enable MCP servers available to the current conversation
Reference note
from Notes Select one article as attachment reference
Clear context
Keep messages, but make the model "forget" the previous conversation (truncate the context)
Custom toolbar
Choose which tools are shown on the default toolbar
Images added to the input box will appear as attachment markers. Hover to preview quickly; click the attachment, or after focusing with the keyboard press Enter / Spaceto open the full image preview.
"Clear context" does not delete messages: the messages still remain in the chat, it just makes the model recognize you anew from this moment on and no longer remember the previous content.
Right side of the input box
Expand / collapse(upper-right corner of the input box): enlarge the input box for writing long text
Thinking(bottom-right dropdown, shown as "Default"): adjust the model's reasoning strength; this can only be adjusted when the selected model supports reasoning. Unsupported models will show "The current model does not support adjusting reasoning strength"
Send: send the message (default Enter, can be changed in Shortcuts )
Triggered via keyboard
The input box hint already lists two quick inputs:
/: open the input shortcut panel and select a tool or action (equivalent to clicking + )@: quote an existing topic and bring its content into the current conversation
After turning on Show estimated token count in [Settings] → [Appearance] → [Input Settings], the input box will also show the estimated token usage for reference (different models tokenize differently; actual billing is subject to the model provider).
Chat settings
of the chat interface message display and input-related preferences are now unified in Settings → Appearance and take effect globally for all chats of all assistants;model parameters are set separately per assistant.
Message display and input settings
The following preferences are adjusted in Settings → Appearance , and the full description can be found in Appearance:
message display: message style (bubble / compact), serif font, message font size, auto-collapse thinking content, show message outline, code line numbers / collapsible code blocks / code block wrapping, code style, math rendering, etc.
input-related: send shortcut, show estimated token count, Markdown-render input messages, confirm before deleting messages, etc.
model parameters
Temperature, Top-P, maximum token count, streaming output, context management, custom parameters, etc. Model parameters are set per assistant, located in the Edit Assistant "Model" tab of the dialog; see below for details Assistant settings.
Assistant settings
in the assistant list right-click the assistant that needs to be set, and select [Edit Assistant] from the pop-up menu to open the assistant editing dialog.
Edit Assistant
Assistant settings apply to all chats under that assistant.
The left side of the edit dialog is divided into five tabs:
Basic: avatar, name, description, the assistant's default model, group
Model: model parameters such as temperature, Top-P, maximum token count, streaming output, context management, and custom parameters
Prompt: that is, the prompt; you can refer to the agent page's prompt-writing method to edit the content
Knowledge base: link an existing Knowledge base
MCP: enable MCP servers for this assistant

Default model (Basic tab)
In the "Basic" tab, you can assign a fixed default model for this assistant; if not set, it will follow the global default chat model.
The assistant's default model has higher priority than the global default chat model. When no assistant default model is set, assistant default model = global default chat model. You can also temporarily switch models at any time from the model drop-down at the top of the chat page.
Model parameters (Model tab)
All of the following parameters are adjusted in the "Model" tab.
Temperature (Temperature) :
The temperature parameter controls the randomness and creativity of the model's generated text (default value is 0.7). Specifically:
Low temperature (0-0.3):
More deterministic and focused output
Suitable for code generation, data analysis, and other accuracy-critical scenarios
Tends to choose the most probable words for output
Medium temperature (0.4-0.7):
Balances creativity and coherence
Suitable for everyday conversation and general writing
Recommended for chatbot conversations (around 0.5)
High temperature (0.8-1.0):
Produces more creative and diverse output
Suitable for creative writing, brainstorming, and similar scenarios
but may reduce text coherence
Top P (nucleus sampling):
The default value is 1; the smaller the value, the more monotonous and easier to understand the AI-generated content becomes; the larger the value, the broader and more diverse the AI's vocabulary range becomes.
Nucleus sampling affects output by controlling the probability threshold for word selection:
Smaller values (0.1-0.3):
Only consider the highest-probability words
More conservative and controllable output
Suitable for code comments, technical documentation, and similar scenarios
Medium values (0.4-0.6):
Balances vocabulary diversity and accuracy
Suitable for general conversation and writing tasks
Larger values (0.7-1.0):
Consider a broader range of vocabulary choices
Produces richer and more diverse content
Suitable for creative writing and other scenarios that require varied expression
These two parameters can be used independently or in combination
Choose appropriate parameter values according to the specific task type
It is recommended to experiment to find the parameter combination best suited to a particular application scenario
The above content is for reference only and to help understand the concepts; the parameter ranges given may not be suitable for all models. Please refer to the parameter recommendations in the relevant model documentation for details.
Context management
Controls how historical context sent with the request to the model is handled. When enabled, this assistant uses custom context management settings (such as automatically compressing long history or truncating by threshold); when disabled, it follows the global settings. The longer the context, the more information the model remembers, but the more tokens it consumes.
Maximum tool call rounds
Limits the number of consecutive tool-call rounds an assistant can make in one reply. New assistants use 100 rounds by default, which can be set between 1 and 1000; existing assistants keep their original value, and older configurations commonly use 20 rounds.
If you see a prompt like "tool-call round limit reached," you can increase this setting appropriately, or split the task into smaller pieces and try again. The higher the number of rounds, the longer the tool chain may run, and it may also consume more tokens; there is no need to raise it for ordinary conversations.
Enable message length limit (MaxToken)
Maximum per response Token count. In large language models, max token (maximum token count) is a key parameter that directly affects the quality and length of the model's response.
For example, in CherryStudio, when testing whether the model is connected after filling in the key, you only need to know whether the model returns a message correctly and not the specific content; in this case, setting MaxToken to 1 is enough.
The MaxToken upper limit for most models is 32k tokens; of course, some support 64k or even more. For details, check the corresponding introduction page.
Exactly how much to set depends on your needs, and you can also refer to the suggestions below.
Recommendation:
Regular chat: 500-800
Short text generation: 800-2000
Code generation: 2000-3600
Long-form generation: 4000 and above (requires model support)
In general, the model's generated response will be limited to the MaxToken range; of course, truncation (for example, when writing long code) or incomplete expression may also occur, and in special cases you need to adjust flexibly according to the actual situation.
Streaming output (Stream)
Streaming output is a data processing method that allows data to be transmitted and processed as a continuous stream rather than sending all data at once. This allows data to be processed and output immediately after it is generated, greatly improving real-time performance and efficiency.
In environments such as the CherryStudio client, simply put, it is the typewriter effect.
When turned off (non-streaming): the model outputs the complete generated information all at once (think of how it feels to receive a message on WeChat);
When turned on: output character by character, which you can understand as the large model sending you each character immediately after it is generated, until everything has been sent.
If some special models do not support streaming output, you need to turn this switch off, such as at the beginning only supporting non-streaming models like o1-mini.
Custom parameters
Add extra request parameters to the request body (body), such as presence_penalty and other fields; ordinary users usually don't need this.
The above parameters like top-p, maxtokens, stream, etc. are all among these parameters.
How to fill it in: parameter name — parameter type (text, number, etc.) — value; reference docs:Click to go
Each model provider has, more or less, its own unique parameters; you need to look for the usage method in the provider's documentation
Custom parameters have higher priority than built-in parameters. That is, if a custom parameter duplicates a built-in parameter, the custom parameter will override the built-in one.
For example, set in custom parameters
modelForgpt-4oafter that, no matter which model you select in the conversation, it uses thegpt-4omodel.
Use Parameter name: undefined settings can exclude parameters.
Get help and submit feedback
If you encounter any questions, bugs, or have suggestions for feature improvements during configuration or use, please refer to Feedback and Suggestions for the official channels provided.
Last updated
Was this helpful?