> For the complete documentation index, see [llms.txt](https://docs.cherryai.com.cn/llms.txt). Markdown versions of documentation pages are available by appending `.md` to page URLs; this page is available as [Markdown](https://docs.cherryai.com.cn/docs/en-us/advanced-basic/knowledge-content/painting-workflow.md).

# Image generation, editing, and enhancement

\[Painting] can do more than generate images from text: it can also use reference images, edit specified areas, combine multiple images, reuse templates, and enhance resolution. First determine the image’s purpose, then choose a generation or editing method.

## Choose the right starting point

| Need                                             | Recommended approach                                                      |
| ------------------------------------------------ | ------------------------------------------------------------------------- |
| Create a visual direction from scratch           | Text-to-image or template                                                 |
| Keep the subject, change the background or style | Upload a reference image and then edit it                                 |
| Only change part of the image                    | Use a mask to mark the area to modify                                     |
| Combine multiple assets into one image           | Merge multiple images and explain the primary and secondary relationships |
| An existing image needs to be clearer            | Use the enhancement/upscaling feature                                     |

### Example: from a single description to a finished piece

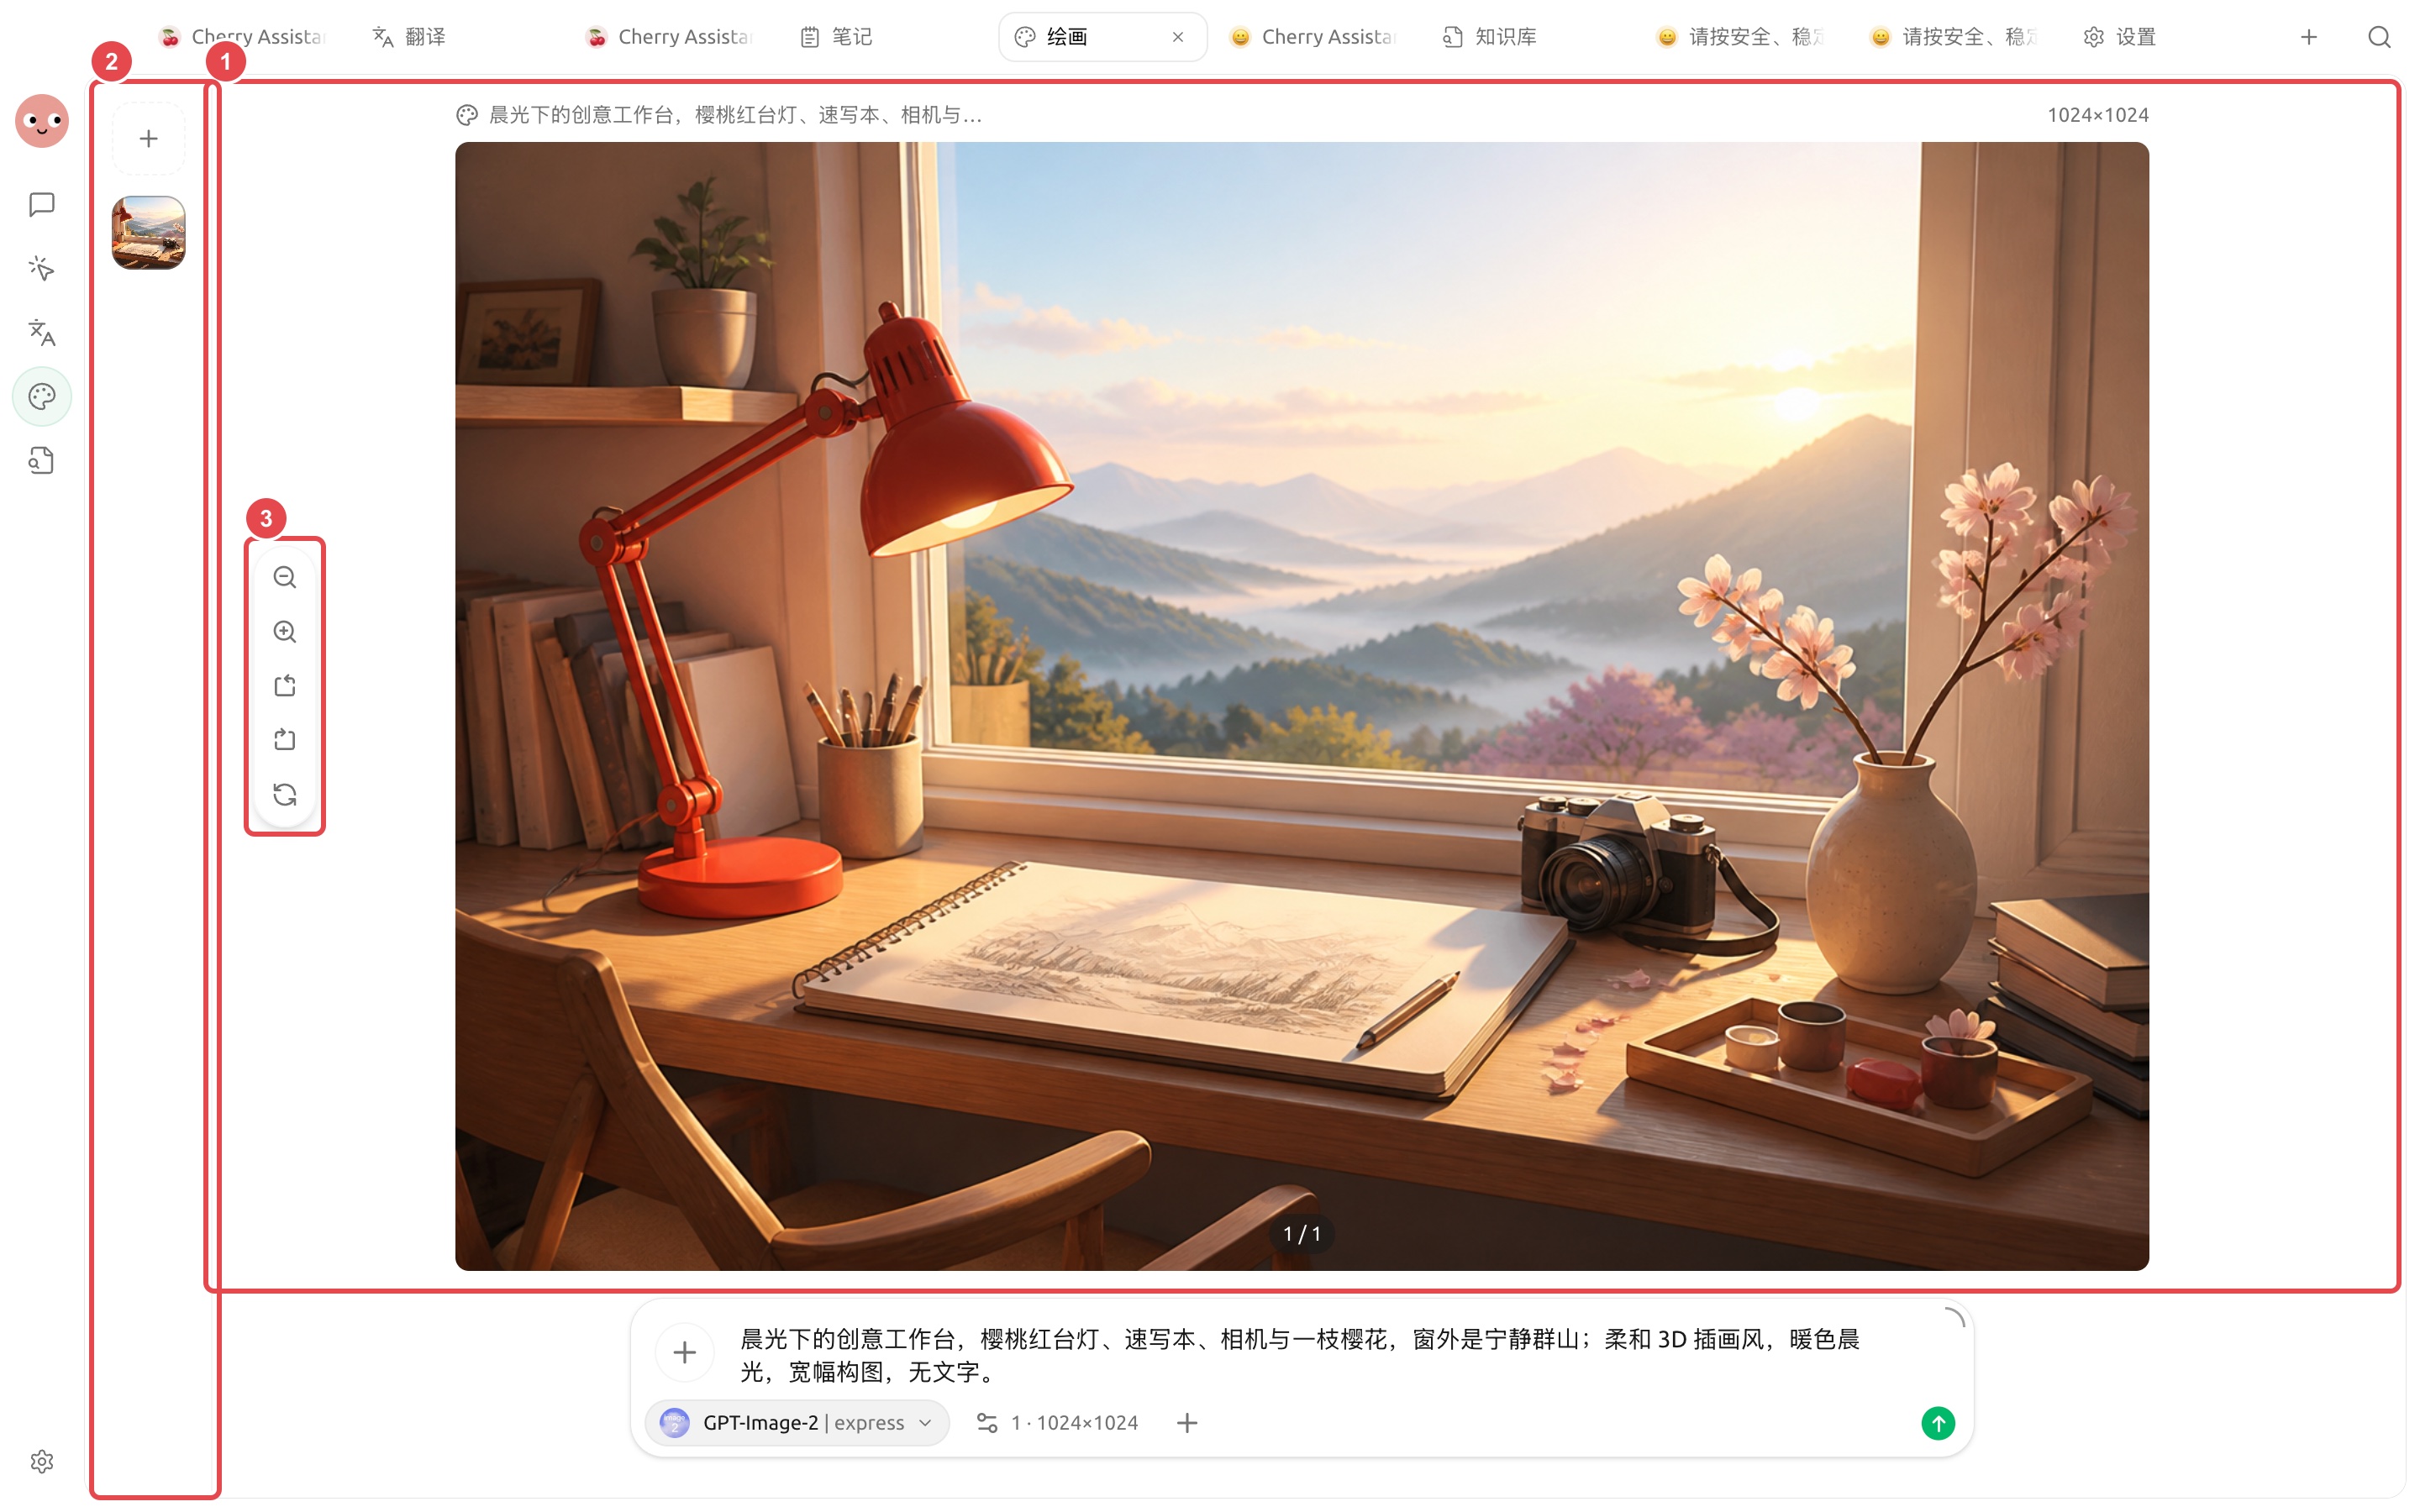
Open \[Painting], choose an image model that supports the current task, enter the subject, environment, style, lighting, composition, and constraints, then send it. The example prompt is:

> A creative workstation in the morning light, a cherry-red desk lamp, sketchbook, camera, and a branch of cherry blossoms, with peaceful mountains outside the window; soft 3D illustration style, warm morning light, wide composition, no text.

```mermaid
flowchart LR
    A [State the purpose and composition clearly] --> B [Choose a painting model]
    B --> C [Generate the first version]
    C --> D {Are the subject, edges, and size usable?}
    D -- No --> E [Modify only one direction]
    E --> C
    D -- Yes --> F [Upscale, inspect, and export]
```

{% hint style="info" %}
This example uses \[GPT-Image-2 | express] to generate a wide-format workstation illustration. The model, size, and available operations depend on what is shown on your current page; do not copy parameters that are not visible.
{% endhint %}

Do not leave immediately after generating: first upscale to check the subject, edges, and stray elements, then switch versions from the left-side history. When adjustments are needed, keep the valid description and change only one direction.

<figure><img src="https://3562065924-files.gitbook.io/~/files/v0/b/gitbook-x-prod.appspot.com/o/spaces%2F0Ut5BptC3t8CtSU1UWpM%2Fuploads%2Fgit-blob-418a088986e17a73a4808871fc4c1f5c1684fa05%2Fcherry-v2-guide-painting-result.jpg?alt=media" alt="使用 GPT-Image-2 express 生成的晨光工作台插画与历史记录"><figcaption><p>1. The left side keeps the history thumbnails of this generation; 2. The middle shows the complete finished image; 3. After upscaling and checking, download, copy, or continue editing.</p></figcaption></figure>

## Complete a usable image

{% stepper %}
{% step %}

### 1. Choose a model and mode

Different image models support different sizes, reference images, and editing capabilities. Do not force in parameters that are not shown on the page based on experience.
{% endstep %}

{% step %}

### 2. State the purpose and composition clearly

Describe the subject, environment, perspective, color tone, aspect ratio, negative space, and what should not appear. If you need to add a title, usually leave blank space for the model, and add the text later with a design tool.
{% endstep %}

{% step %}

### 3. Verify only one direction at a time

First generate a small batch of results, then choose the closest image to edit or enhance. Generating multiple versions at once increases usage and makes it harder to tell which requirement had an effect.
{% endstep %}

{% step %}

### 4. Inspect details before exporting

Zoom in to check the character’s hands, product structure, text, brand logos, and edges. If it will be used commercially, confirm the source of the materials and the applicable service terms.
{% endstep %}
{% endstepper %}

### Draw images in Agent

First go to \[Settings] → \[Default model] and select \[Painting model], then open Agent’s \[Built-in tools] to make sure \[Generate images] is enabled. After that, in \[Work], you can have Agent read the article first, extract the visual direction, and then generate the accompanying image directly.

<figure><img src="/files/b127156db3f9cbfffb53b86f8bf2508d028d0c8a" alt="默认模型设置中的绘画模型选择"><figcaption><p>The [Painting model] in [Default model] determines which model Agent and related painting entry points will preferentially use.</p></figcaption></figure>

### Application case: creating a set of brand campaign visuals

First define a unified color palette, camera framing, and negative-space rules in the template, and generate a wide-format hero image. After choosing a direction, use the same reference image to create a square social post and a vertical story image; if the product appearance is inconsistent, fix it with local editing, and finally upscale the version that needs to be deployed. Throughout the process, do not let the model generate brand text to avoid typos and distortion.

{% hint style="warning" %}
Reference images may be sent to the selected model service. Before uploading customer data, portraits, and unpublished product images, confirm the scope of services that are allowed to use them.
{% endhint %}


---

# Agent Instructions
This documentation is published with GitBook. GitBook is the documentation platform designed so that both humans and AI agents can read, navigate, and reason over technical content effectively. Learn more at gitbook.com.

## Querying This Documentation
If you need additional information that is not directly available in this page, you can query the documentation dynamically by asking a question.

Perform an HTTP GET request on the current page URL with the `ask` query parameter, and the optional `goal` query parameter:

```
GET https://docs.cherryai.com.cn/docs/en-us/advanced-basic/knowledge-content/painting-workflow.md?ask=<question>&goal=<endgoal>
```

`ask` is the immediate question: it should be specific, self-contained, and written in natural language.
`goal` is optional and describes the broader end goal you are ultimately trying to accomplish on behalf of the user. GitBook uses it to tailor the answer towards what is most useful for that goal.

The response will contain a direct answer to the question and relevant excerpts and sources from the documentation.

Use this mechanism when the answer is not explicitly present in the current page, you need clarification or additional context, or you want to retrieve related documentation sections.
