> For the complete documentation index, see [llms.txt](https://docs.cherryai.com.cn/llms.txt). Markdown versions of documentation pages are available by appending `.md` to page URLs; this page is available as [Markdown](https://docs.cherryai.com.cn/docs/en-us/advanced-basic/agent-workspace/create-agent.md).
# Create Agents and divide model responsibilities
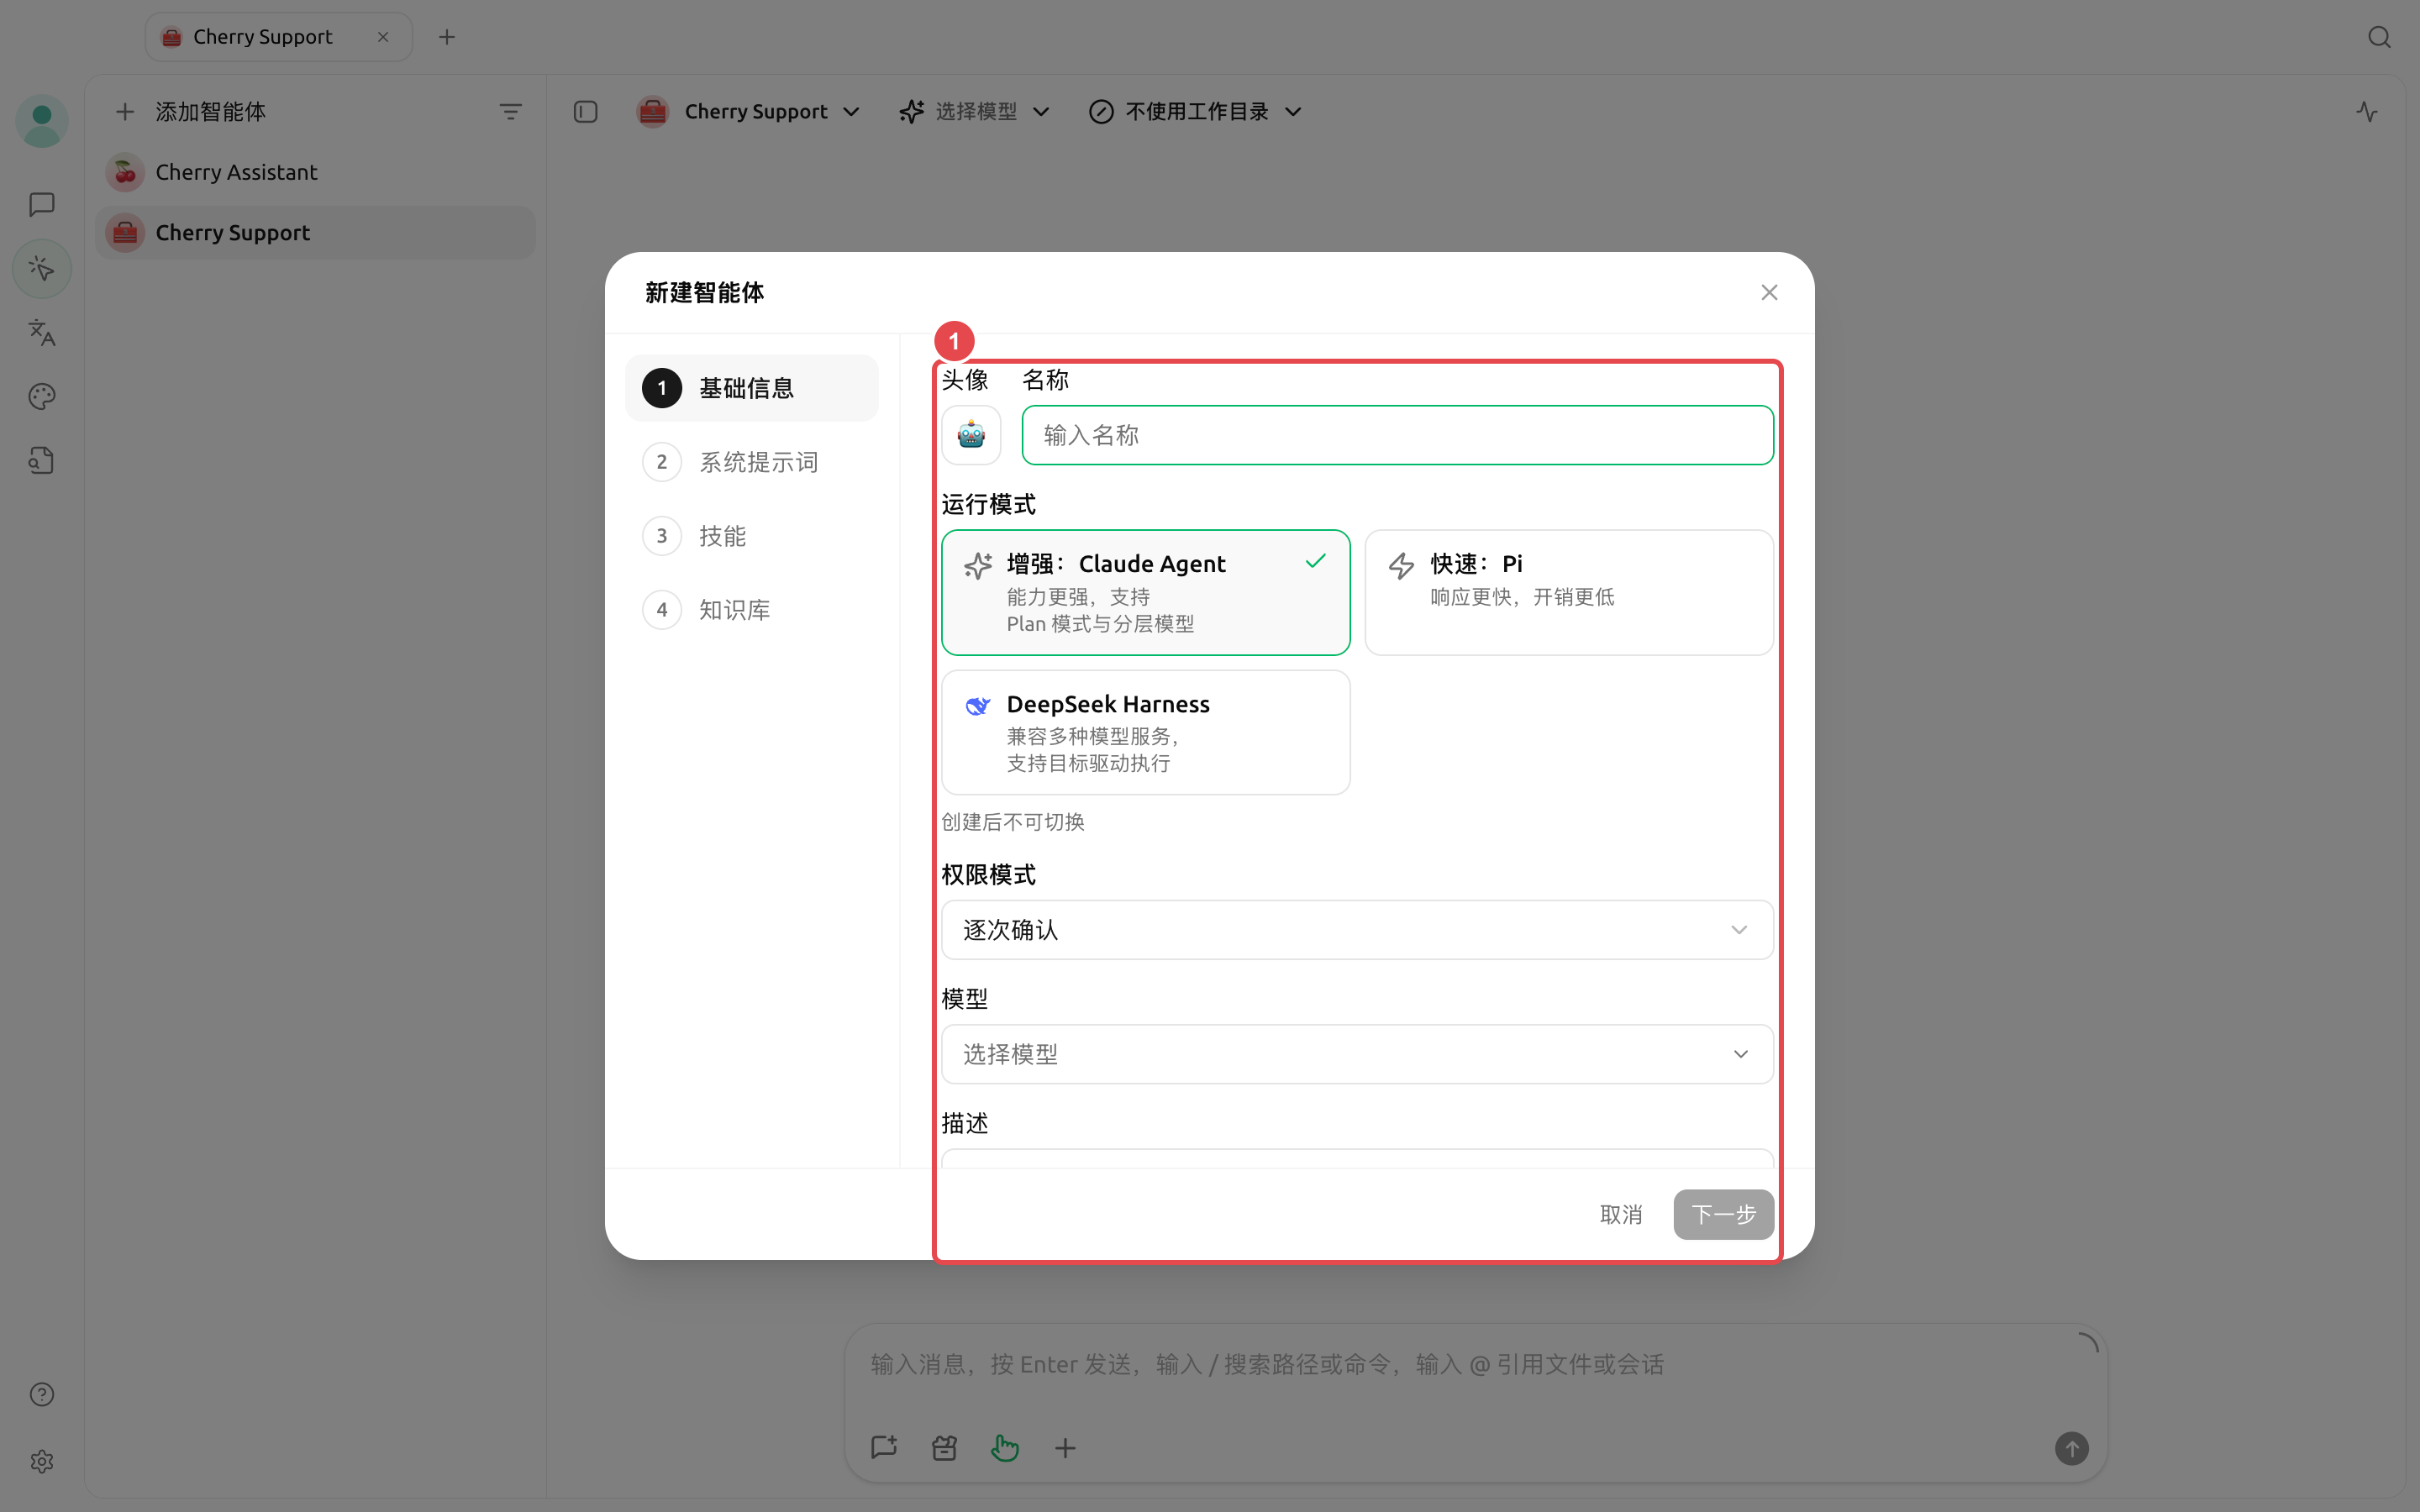
Create entry point: left navigation \[Work] → \[Add Agent].
The new wizard is divided into four steps: \[Basic Information], \[System Prompt], \[Skills], and \[Knowledge Base]. In the first step, you also need to select a run mode; the run mode determines the Agent's available model roles, permission mode, and some tools, and cannot be changed after creation.
### How to choose a run mode
| Run mode | Key features | Model configuration | Permissions and restrictions |
| ------------------------- | ----------------------------------------------------------------------- | ----------------------------------- | -------------------------------------------------------------------------------------- |
| \[Enhanced: Claude Agent] | Fully capable, suitable for complex, multi-step tasks | Main model, Plan model, Small model | Supports all permission modes and heartbeat detection |
| \[Fast: Pi] | Fast response, low cost, suitable for everyday file and coding tasks | Only configure the main model | Does not provide \[Plan only]; defaults to \[Smart Approval] when created |
| \[DeepSeek Harness] | Compatible with multiple model services, supports goal-driven execution | Only configure the main model | Does not provide \[Smart Approval] or heartbeat detection; supports `/compact`,`/goal` |
{% hint style="warning" %}
The run mode cannot be changed after creation. If the goal, model compatibility, or permission requirements change fundamentally, create a new Agent instead of continuing to modify the old one.
{% endhint %}
### How to fill in the four steps
{% stepper %}
{% step %}
#### 1. Basic Information
Write the name as a job role or task type, such as "Contract Review" or "Content Planning." First select a run mode, then choose a compatible model listed on the page. The description is only used to help identify the purpose; the main model handles the main reasoning and execution.
{% endstep %}
{% step %}
#### 2. Write the system prompt
Clearly define the role, goal, boundaries, and output format. Rather than piling up adjectives, provide actionable rules: list risks first, then quote the original text, and finally give modification suggestions; when information is insufficient, clearly mark it and do not guess.
{% endstep %}
{% step %}
#### 3. Select skills
Only select skills related to how this Agent will work long term. Skills can be installed in \[Settings] → \[Skills], or you can let the Agent help you find and install them later.
{% endstep %}
{% step %}
#### 4. Bind knowledge base
Only bind knowledge bases that the Agent truly needs to retrieve from. When no knowledge base is bound, knowledge base search and management tools will not appear in the Agent's tool list.
{% endstep %}
{% endstepper %}
First choose the main model; only configure the Plan model and Small model if the task truly requires planning division of labor or lightweight processing.
### Continue configuring after creation
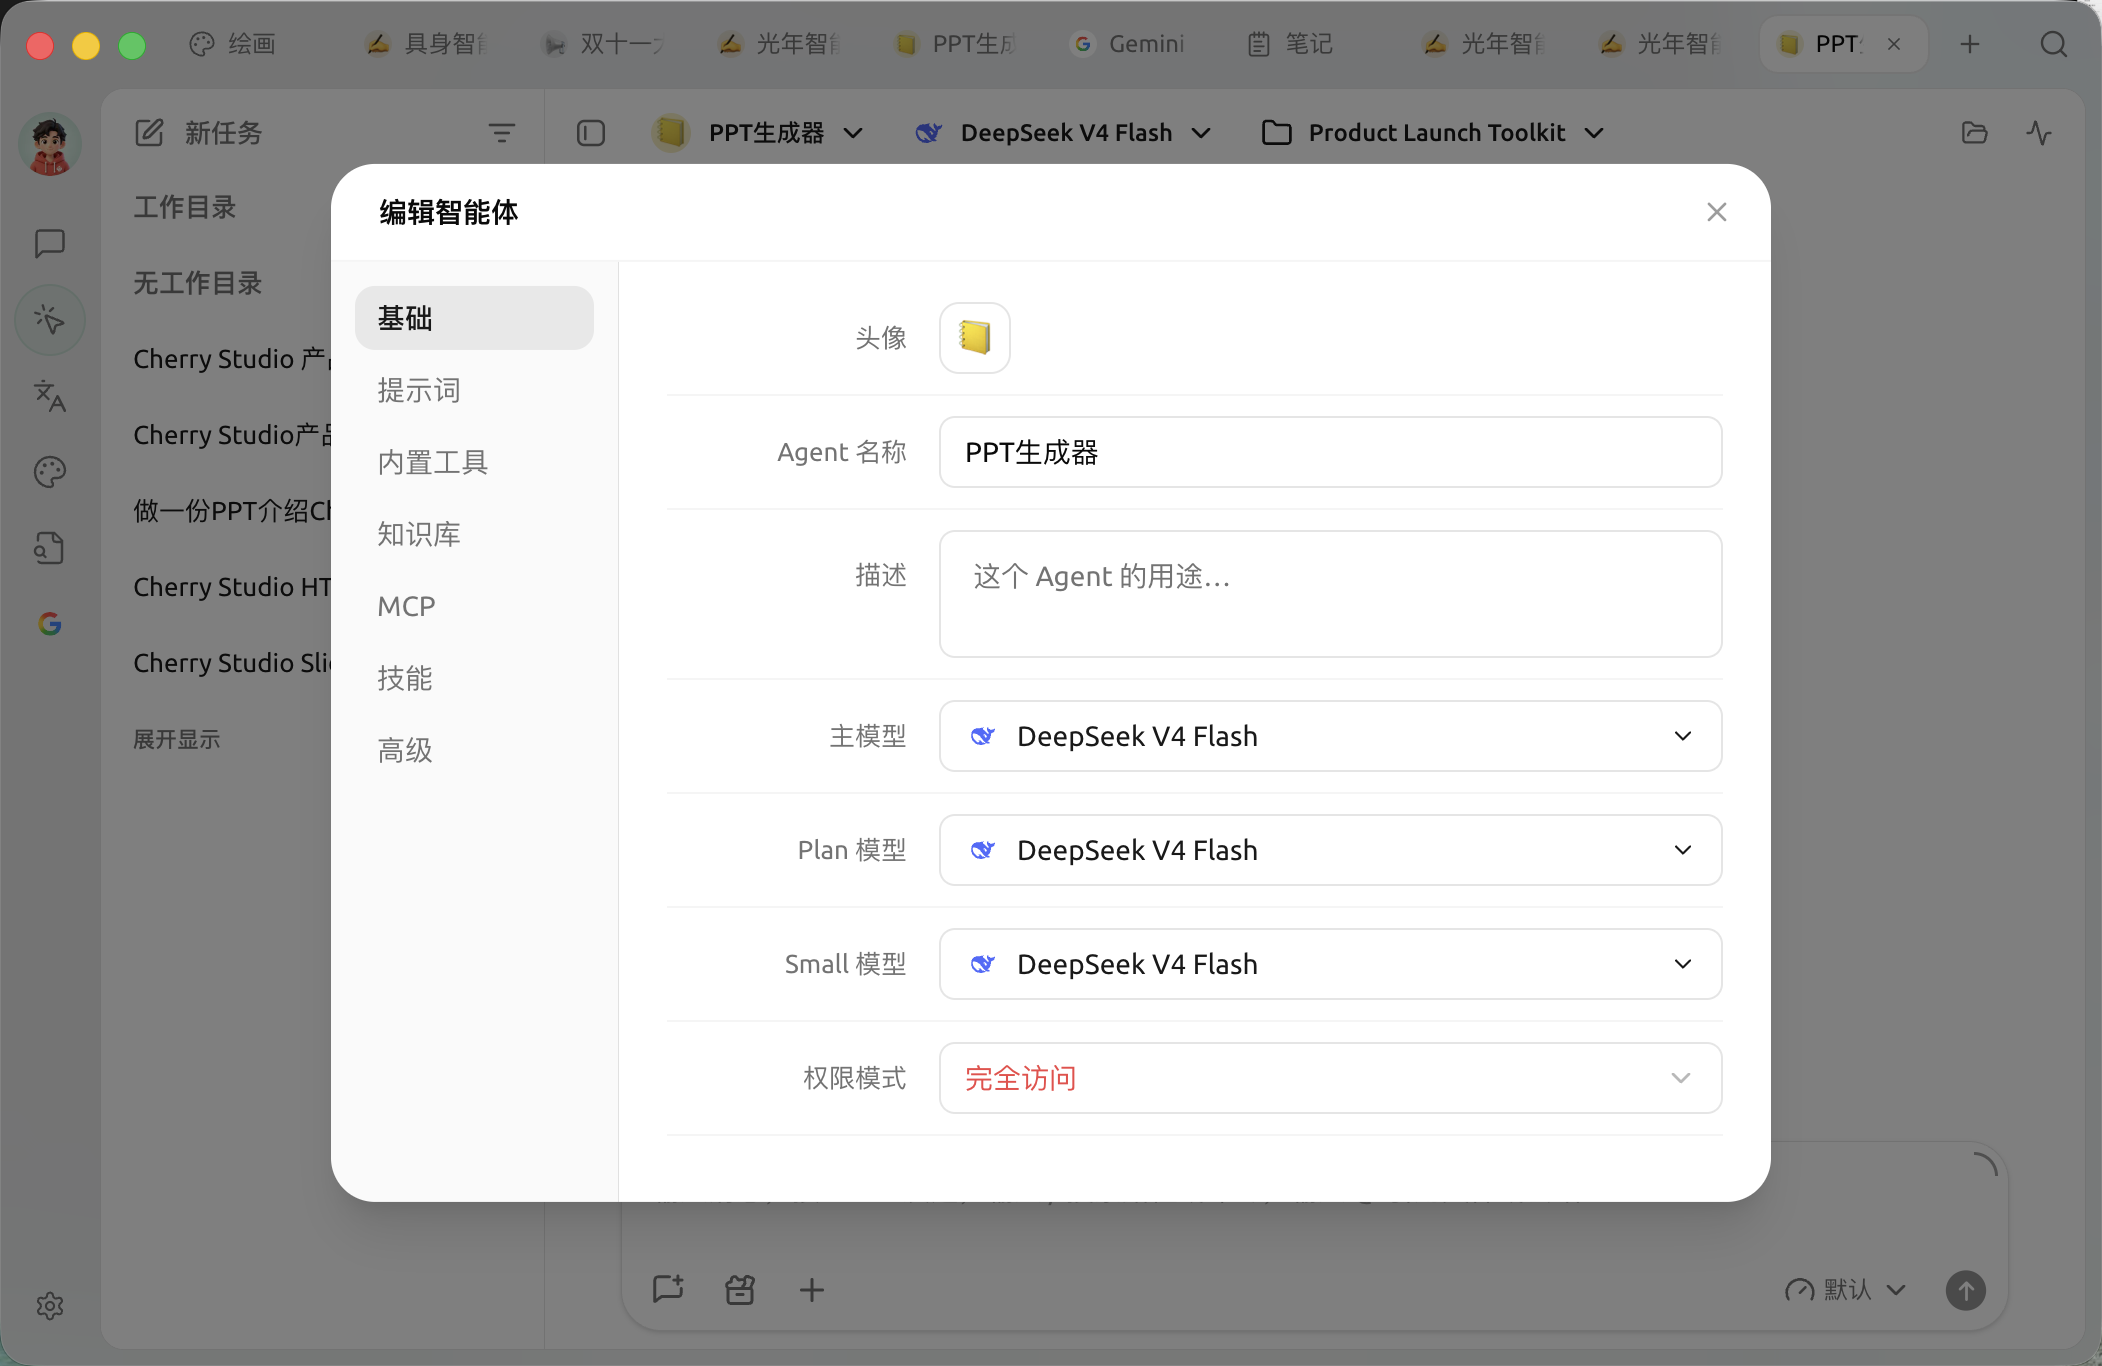
Open the menu in the Agent list and choose Edit to adjust the following:
* \[Basic]: view the run mode and adjust the models, permissions, and heartbeat settings supported by that mode;
* \[Prompt]: role description, processing rules, and behavioral boundaries;
* \[Built-in tools]: files, search, images, notifications, scheduled tasks, memory, sub-agents, and workflows, etc.;
* \[Knowledge Base]: restrict the knowledge bases the Agent can access;
* \[MCP]: bind already connected MCP servers;
* \[Skills]: select installed skills;
* \[Advanced]: set environment variables for tools that truly require them.
{% hint style="info" %}
The current edit window automatically saves changes. If there is still unsaved content before closing the window, the app will finish saving first; if saving fails, the window will remain open and display an error.
{% endhint %}
### Recommended starting point
| Configuration item | Product default | Recommended starting point | Function | Applicable scenario | Notes |
| ------------------- | --------------------------------------------------------------------- | --------------------------------------------------------------- | --------------------------------------------------------------- | --------------------------------- | ------------------------------------------------------------------------------------------ |
| Run mode | \[Enhanced: Claude Agent] | If unsure, start with \[Enhanced: Claude Agent] | Determines model division of labor, permissions, and tool scope | All Agents | Cannot be switched after creation |
| Main model | Uses the model selected at creation | Choose a model that has been verified to call tools stably | Main reasoning and execution | All Agents | The selector filters out incompatible models based on the run mode |
| Plan / Small models | Same as the main model | Keep it consistent with the main model first | Task decomposition, simple judgment, and formatting | Only \[Enhanced: Claude Agent] | Pi and DeepSeek Harness do not display these two fields |
| Permission mode | Claude/DSH use \[Confirm Each Time]; Pi uses \[Smart Approval] | For real project directories, \[Confirm Each Time] is preferred | Determines whether tools need approval | File, terminal, and network tasks | \[Full access] may delete files or access the network |
| Heartbeat detection | Supported run modes are enabled by default, with a 30-minute interval | Can be turned off when there are no ongoing tasks | Let the Agent check its work periodically | Claude Agent, Pi | DeepSeek Harness does not provide heartbeat detection; use scheduled tasks for fixed times |
### User case: contract review Agent
Create a "Contract Review" Agent, choose a verified model as the main model, require output in the prompt using "risk clause, original text location, impact, suggestion," bind the company policy knowledge base, and keep permissions at \[Confirm Each Time]. Create a new task for each contract and select the corresponding file directory to avoid mixing different clients' materials in the same context.
Why didn't I see the full MCP and permission settings during creation?
The creation wizard only keeps the common steps. After creation, open the Agent edit window to continue configuring in \[Basic], \[Built-in Tools], \[Knowledge Base], \[MCP], \[Skills], and \[Advanced]; the specific tabs will change based on the run mode's capabilities.
---
# Agent Instructions
This documentation is published with GitBook. GitBook is the documentation platform designed so that both humans and AI agents can read, navigate, and reason over technical content effectively. Learn more at gitbook.com.
## Querying This Documentation
If you need additional information that is not directly available in this page, you can query the documentation by asking a question.
Perform an HTTP GET request on the following URL with the `ask` and `goal` query parameters:
```
GET https://docs.cherryai.com.cn/docs/en-us/advanced-basic/agent-workspace/create-agent.md?ask=&goal=
```
`ask` is the immediate question: it should be specific, self-contained, and written in natural language.
`goal` is what the user is ultimately trying to achieve, the reason they need the answer. Sharing it helps GitBook give you a better, more relevant answer. A goal is most helpful when it describes the outcome the user wants rather than restating the question. For example, with `ask=how do I create an API token`, a goal like `automate deployments from our CI pipeline` lets GitBook tailor the answer to that use case.
The response will contain a direct answer to the question and relevant excerpts and sources from the documentation.
Use this mechanism when the answer is not explicitly present in the current page, you need clarification or additional context, or you want to retrieve related documentation sections.